Wavelengths for Optimal NIRS Device Functionality

As described in previous blog posts about Near Infrared Spectroscopy (NIRS), NIRS is a valuable tool to measure oxygen concentration in the body. It can be used on various parts of the body including the muscles and brain. These applications of NIRS to measure oxygen concentration is useful in metabolic kinetics research, diagnoses of disease conditions [1], and as an athletic performance measure. Recent advancements in NIRS technology have allowed for the development of portable NIRS devices that can be worn while exercising. In this post, I will be focusing on the use of NIRS technology for the measurement of muscle oxygenation. 

The main benefit of NIRS is that it can measure oxygen concentration, as discussed above. In order to do this the use of spectroscopy methodology is used. Spectroscopy is when light of a specific wavelength is transmitted through a substance and the amount of light the substance absorbs is measured and called the absorbance. From the absorbance, the concentration of a solute can be determined using Beer-Lambert’s Law. The Beer-lambert’s Law relates the light intensity to the product of the molar absorptivity (ε, L/mol*m), the substance concentration (c, mol/L), and the path length  (L, m). Due to the path length not being perfectly defined, a modified version of the Beer-Lambert’s Law is used (Equation 1) that accounts for any scattering (g) of the light beam as it travels through the tissue. The initial intensity of the light (I) then is the sum of the light that is reflected, the light that is transmitted to the detector and the light that is scattered throughout the tissue. 

log10(I0/I) = εcL+g     (1)

As I have outlined, the main function of NIRS for measuring muscle oxygenation is to be able to measure the absorbance of the hemoglobin in the blood. To do this the right wavelengths must be able to penetrate the body and get picked up by the detector where the absorbance can be measured. By solving the problem of what wavelength of light to use, the device can effectively function for its purpose and be reliable. The wavelength of light appropriate depends on what is being looked at. In the case of NIRS, the absorbance of hemoglobin in the blood is the target substance. When oxygen is bound to hemoglobin (oxyhemoglobin), the hemoglobin has a different absorbance value (Figure 1) than if there is no oxygen bound to it (deoxyhemoglobin). The question is: what is the appropriate wavelength to use?

Figure 1. Absorbance curves for oxyhemoglobin (red) and deoxyhemoglobin (blue).

https://commons.wikimedia.org/wiki/File:Oxy_and_Deoxy_Hemoglobin_Near-Infrared_absorption_spectra.png

In order to work through and solve the problem of what wavelength to use, we must first consider what is known and what is unknown. Referring to Equation 1, the modified Beer-Lambert Law, the absorptivity is a known variable dependent on the solute looking at. Another known variable is the path length that can be determined by measuring the length between the light source or probe and the detector surface. That leaves the solute concentration and the scattering term as the unknowns. In order to solve the equation for concentration and determine the optimal wavelengths for NIRS device functionality, the scattering term needs to be eliminated from the equation. In order to do this, we need to realize that the scattering term is very variable; it depends on the subject, the location, and muscle the NIRS device is being used on. For the device to be used by a larger population the scattering term must be normalized and this is accomplished by finding the change in concentration. This is why concentrations are reported not in absolute concentrations but in relative measures, percentages. By subtracting two absorbances (change in absorbance), the scattering terms will cancel out assuming the scattering term is the same over one location. Now the equation for change in concentration is:

log10(I0/I) = εΔcL     (2)

Now when we account for the fact that NIRS measures not only oxyhemoglobin concentrations but also deoxyhemoglobin concentrations we need to expand our equation to account for both. That means that the change in concentration is the change in concentration of oxyhemoglobin and the change of concentration in deoxyhemoglobin. 

log10(I0/I) = (εO2ΔcO2 + εHbΔcHb)L     (3)

When we add another unknown thought we need to generate another equation to be able to solve for the two unknown concentrations leaving us with the following equations, Equation 4.

https://cdn.iopscience.com/images/0031-9155/51/5/N02/Full/pmb211409eqn04.gif

Now that we have equations where the subscripts λ1 and λ2 are the two wavelengths [2] and the subscripts O2 is for oxyhemoglobin and Hb is for deoxyhemoglobin. There is one unknown in each so we can now determine a wavelength that will be optimal for both oxyhemoglobin and deoxyhemoglobin so the NIRS device will be able to measure oxygen concentration in the muscles. Solving the equations so that one is sensitive to oxyhemoglobin, and one is more sensitive to deoxyhemoglobin, we come up with the optimal range of 0.7 um to 2.5 um. The near infrared region of light. This is reasonable and coincides with what research says that near infrared light is the optimal waveforms to have light waves penetrate the muscles and measure oxygen concentrations [3]. 

In this solution, we made the assumption that the scattering term was the same in the same location but that is not necessarily the truth. If the light was angled differently when it was absorbed, there could be different amounts of scatter even in the same location. Without this simplification, the equation would be much more complex because it would have to take into consideration all factors that affect the scattering of light waves in the tissue which would require frequent calibrations and mathematical adjustments. Now that we have answered the question of what wavelengths are optimal for the NIRS to measure oxyhemoglobin and deoxyhemoglobin concentrations we can start measuring concentration! 


References:

[1]  Adami A, Rossiter HB. Principles, insights, and potential pitfalls of the noninvasive determination of muscle oxidative capacity by near-infrared spectroscopy. J Appl Physiol (1985) 124: 245–248, 2018. doi:10.1152/japplphysiol.00445.2017. https://journals.physiology.org/doi/full/10.1152/japplphysiol.00445.2017

[2] “About NIRS (Principle of Operation and How It Works),” About NIRS (Principle of Operation and How It Works) | SHIMADZU EUROPA. [Online]. Available: https://www.shimadzu.eu.com/about-nirs-principle-operation-and-how-it-works. [Accessed: 13-May-2020].

[3] L. Kocsis, P. Herman, and A. Eke, “The modified Beer–Lambert law revisited,” Physics in Medicine and Biology, vol. 51, no. 5, 2006.

Sweat Sensor Channel Geometry

Identify

Soft microfluidics revolutionized the development of sweat sensors by providing increased flexibility so the device can be worn on the skin while an individual is exercising. The material selected for these sensors is important for the flexibility and comfort of these devices. Elastomers with a low modulus but high elasticity are typically chosen as they allow the user to easily move while still obtaining sufficient sweat collection by close contact and flexibility upon the skin [1]. As these types of materials can more easily deform, it is important to consider the geometric design of these microfluidic channels. It is important the sweat sensor can withstand external forces or pressures, such as the individual touching the sensor, especially during exercise. These channels should not easily deform as significant deformation could greatly interfere with the volume of sweat collected, in addition to other measurements like sweat rate and the measured analyte concentrations.

It is important to first understand how externally applied forces influence the deflection of the microfluidic channels. We can then understand how the volume of these channels changes in response to applied forces which will allow us to select the optimal geometry that minimizes the change in volume to increase the accuracy of the device in realistic conditions [2]. If we want to account for externally applied forces that might be applied to the sweat sensor during use, should we design narrow or broad channels? Should there be considerations for height? To understand these questions, we will need to understand how the width and height ratio of microfluidic channels influences the percentage of volume change within these channels.   

Formulate

To solve this problem, we will assume that the applied pressure acts as a uniformly distributed vertical load across the channel width. For simplicity we will only be calculating the results for a single channel, but the principles could be used to calculate the entire surface of the sweat sensor. Since the channels of sweat sensors are often rectangular, we will model the sweat sensor as a rectangular beam that is fixed on both ends. Once the sweat sensor is placed onto the skin we are assuming it is permanently in place as any movement of the sensor would ruin the obtained results. We are also assuming the channel has uniform thickness.

Figure 1. Cross section of microfluidic channel. For our calculations, L will be the width of the channel, h the height of the channel, and t the thickness of the channel. The channel length is a.

Figure 2. Channel free body diagram. Free body diagram of a beam fixed at both ends with uniform distributed loading applied [3]. L is the width of the channel.

Solve

The free body diagram of Figure 2 can be solved to find the vertical reaction forces at the fixed ends. By symmetry, the two vertical reaction forces are equal to the force of the distributed load which is the load times the length. Each vertical reaction force is equal to wL/2.

We can calculate the bending moment equation by making a cut in the beam to understand internal forces and moments and solve for the bending moment.

Figure 3. Cut channel section. In this figure, w is the distributed load, N is the normal internal force, V is the internal shear force, Mx is the internal moment at an arbitrary cut, FAX and FAY are reaction forces at fixed end A, and MA is the fixed end moment at A. Mx is defined in the positive direction and x is an arbitrary length along the total width (L) of the beam.

Solve for the bending moment equation:

The sum of the moments equals 0 and any horizontal forces do not create a moment about point A. As shown in Figure 2, the moment about a fixed end for a uniform distributed load is equal to wL2/12. 

Calculate deflection:

Calculate change in volume:

Equation (6) gives us the relationship between the width (L) and the height (h) of the channel so we can understand how the channel geometry influences the change in volume of the channel with externally applied forces. A positive change in volume is reasonable as our deflection of the channel was positive as well. These results were also found in a study analyzing colorimetric sweat sensors that found that narrow channels had a smaller volume change compared to broad channels [1]. There are several limitations to these calculations for practical applications. We analyzed the influence of deflection that caused a change in the height by vertical loading, but realistically the forces might have other components. Depending on how the sweat sensor adheres to the skin, the assumption of fixed ends may not always apply. There may also be instances in which the force applied is not uniformly distributed, but may act at a specific point.

Although the channel height is important to consider, the channel width is a much greater influence on the change in volume of the channel with deflection as it is raised to the fourth power. The height is only raised to the first power which has a less impact on the change in volume when considering external forces. We should aim to use narrow channels in the microfluidic channel design of our sweat sensor compared to broad channels as increasing the width increases the amount of deflection of the channel by equation (5) and produces a greater change in the volume of the channel.


References

[1]. Koh A, Kang D, Xue Y, et al. A soft, wearable microfluidic device for the capture, storage, and colorimetric sensing of sweat. Sci Transl Med. 2016;8(366):366ra165-366ra165. doi:10.1126/scitranslmed.aaf2593

[2]. Rogers, John, et al. Soft, wearable microfluidic systems capable of capture, storage, and sensing of biofluids. United States Patent WO2017218878 A1.  United States Patent and Trademark Office. 16 June 2017.

[3]. Engineering Stack Exchange. Structural engineering – How to determine fixed end moment in beam? https://engineering.stackexchange.com/questions/15040/how-to-determine-fixed-end-moment-in-beam. Accessed May 14, 2020.

Solving for Minimum Thickness of a Force Plate

Identify

Force plates are a popular way to measure the ground reaction forces generated by an athlete when running or jumping. It is important that the force plate is capable of withstanding these forces continuously by different athletes and be able to last a long time, as they tend to be expensive. A key factor in designing a force plate that meets these requirements is making sure that the plate itself has a thickness that is optimally measured. Some quantities that need to be taken into consideration when designing the geometry of a force plate are the maximum forces that could be acting on the plate and the material properties of the chosen material used in making the technology. Thickness is a crucial quantity in making sure that the force plate is resistant to fatigue.

Formulate

The average force plate is composed of AISI stainless steel 304, which has a modulus of elasticity of 193 x 10^3 MPa and a Poisson’s ratio of 0.29 [3]. In order to accommodate force at maximum conditions, the force plate should be designed to withstand 5000 N. The geometry of the plate also needs to be taken into consideration. A standard size force plate manufactured by Bertec [1] is 16 in in width and 24 in in length. The last consideration that needs to be made is how much the force plate should be allowed to deform. In order to prevent fracture, the plate needs to be able to deform a small amount but not enough to alter force readings. For this calculation, we will assume that maximum deformation is 1 cm.

Solve

  1. Solve for maximum stress applied to plate: σ = F/A = 5000 N / (0.4064 m x 0.6096 m)

      σ = 20,182.3 Pa

2. Set up modulus of elasticity formula: E = σ/ε [2]

3. Insert into modulus equation: (1.93 x 10^11) = 20,182.3 / ε, ε1.05 x 10^-7

4. Plug into Poisson’s ratio equation: v = -ε(x)/ε(z), 0.29 = (1.05 x 10^-7) / (0.01/t)

From this, we find that t = 27,624.3 m which is an unreasonable value. This shows that there was an error in my calculation. Realistically, a force plate would have a thickness of roughly 2 in, such as the Bertec force plate.

References

[1] Bertec. (n.d.). Force Plates. Retrieved from https://www.bertec.com/products/force-plates

[2] Engineering ToolBox, (2005). Stress, Strain and Young’s Modulus. [online] Available at: https://www.engineeringtoolbox.com/stress-strain-d_950.html

Isokinetic Dynamometers: Getting Voltage from Muscle Force

Examples of Isokinetic Dynamometers

One of the functions of an isokinetic dynamometer is to measure the amount of force the user of the machine is outputting. They do this in different ways, but one design goes as such:

  1. User applies force to the machine at it’s load cell (such as extending their leg like in the image above)
    Dynamometer Load Cell
  2. The strain gauge in the load cell deforms from the force

    Strain Guage Deformation

  3. The deformation of the strain gauge causes a change in it’s electrical resistance.
  4. Using a Wheatstone bridge and voltmeter, the change in resistance can be measured.

Wheatstone Bridge

So in the end, the computer program reads a voltage and from that determines the muscles force. It needs some sort of equation relate the two. We’ll walk through the steps in coming up with that equation.

  1.  How does force deform the load cell?
    When the user kicks his/her leg out against the machine, the load cell wants to stay in place, and the user isn’t able to accelerate the load cell no matter how hard they push. Since that force isn’t causing motion, it’s causing the load cell (and it’s strain gauge on the inside) to stretch a little bit, causing a CHANGE IN LENGTH. The load cell will follow the following response due to the stress it feels during the exercise:
    The materials chosen for the load cell will be such that the maximum force expected to be experienced by the machine would keep the plot in the linear, elastic region. In this region the load cell can elastically return to it’s original length when the force is removed and doesn’t permanently deform.

    1. We can determine the STRESS the load cell experiences if we control the LOAD CELL AREA. The MUSCLE FORCE is variable and depends on the user (see equation in plot)
    2. We can solve for STRAIN by using young’s modulus to relate STRESS to STRAIN
      STRAIN=STRESS/YOUNG’S MODULUS
    3. We can get CHANGE IN LENGTH if we know STRAIN and the ORIGINAL LENGTH Of the strain guage.
      CHANGE IN LENGTH=STRAIN*ORIGINAL LENGTH
    4. All together, the CHANGE IN LENGTH is given by this equation:
  2. How does deformation affect resistance of the strain gauge?
    The load cell deforming causes the strain gauge to deform the same amount. Let’s assume the strain guage is a cylindrical wire.

    Resistance of A Wire

    As long as the cross sectional area and resistivity of the wire are controlled, we can solve for the change in length to get the strain gauge’s electrical resistance.

    1. LENGTH OF WIRE=ORIGINAL LENGTH+CHANGE IN LENGTH
    2. Bringing it all together
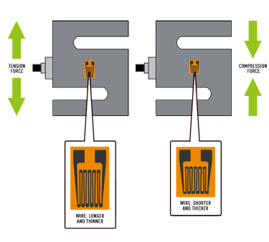
      With resistivity, original length of wire be constants and cross-sectional area changed being assumed miniscule, so also constant for simplicity
  3.  How is change in resistance measured?
    For this, a wheatstone bridge is used.
    Using the voltage divider rule we are able to know what the voltage at both sides of the path in the wheatstone bride above are. Using a voltmeter, we can read the difference in voltage across the two paths. The resistors R1,2,3 are all constants chosen by the designer. Only the strain gauge resistance is variable which scales based on the muscle force applied.

    1.  Bringing it all together:

Everything in this equation is constant besides muscle force. The material properties and sizes are all determined by the materials and dimensioning of the designer. Remember that we assumed that the cross sectional area of the wire remains constant. In actuality it thins a little as the wire is elongated, which would cause a a greater increase in the change in resistance than if it was constant. This greater increase in resistance would give us a smaller voltage readout.

Also, as the machine is used over time it’s material properties will degrade and some of the constants will shift, so calibration of this equation over time will be necessary for accurate results. But this gives us the fundamental equation to measure force using a dynamometer.


I hope that was easy to follow along. Of course, feel free to reach out in the comments below if you have any questions.

Solving Heart Rate Data Inaccuracies

Identify

Heart rate monitors are useful for athletes, researchers, and clinicians as a method of assessing fitness and cardiovascular health. Heart rate is a basic measure that clinicians use to monitor patients and typically do so with electrocardiogram (ECG). ECG is not as easy to measure upon movement and often requires larger, non-portable measurement devices. For athletes who seek to measure heart rate during exercise, these heart rate monitors are found in the form of a watch or chest strap. Despite its wide-use and high level of reporting, user activity can affect heart rate monitor accuracy. For LED heart rate monitors, where a light is emitted onto the user’s skin as opposed to electrodes that rest on the surface of the skin in ECG, position of the device on the body (Figure 1) and user activity can potentially affect the heart rate data. The issue of erroneous data is especially prevalent for multisport athletes who engage in activities that require different body positions and movements.

Obtaining consistent heart rate data collection and analysis is essential for being able to compare data across activities. For example, an athlete may have a reported average heart rate over a cycling activity as 110bpm and 140bpm during a running activity. Is this difference is due to different intensities for each activity or is it due to inconsistencies in data collection due to different noise factors dependent on activity?

Being able to identify characteristic noise frequencies based on user activity and monitor placement can greatly benefit athletes. This will allow users to either change the placement of the device based on their activity or, more favorably, input the activity to the device prior to data collection, allowing the device to prepare different filtering techniques based on expected noise for that particular activity. Applying these filters to the device would enhance heart rate monitor design and better ensure accurate data.

Formulate

Before solving this problem, a basic understanding of heart rate monitors is necessary. LED heart rate monitors emit a green light to the user’s skin. Some of this light is absorbed, and some is reflected back into a receiver within the device. The absorption can be modeled using the Beer-Lambert law, A =  ε𝓁c, where absorbance (A) is equal to absorptivity (ε), beam length (𝓁), and concentration of absorbing species  (c) [4].

The intensity of the light, based on absorbance, is evaluated by a photodiode in the receiver and is transformed into a photoplethysmogram (PPG) signal by the device’s processor. This PPG signal contains cardiac, respiratory, and motion data, as well as noise. Filters act to remove non-cardiac components from the PPG signal [1] – this is where heart rate data error can occur if not enough noise is removed (Figure 2). Since motion is a noise component in the PPG signal, heart rate data can be influenced by monitor position and user activity [2].

To assess potential discrepancies in heart rate data based on monitor position and user activity, two heart rate monitors can be worn in different locations during various activities (Figure 1). In data collection, it is important to know heart rate data for each of these monitor placements over time at rest and during different activities. It is also important to use a ECG monitor as a reference (i.e a verified, widely-used chest strap) to know what heart rate data should be.

Assumptions made in solving this issue is that light intensity emitted from the heart rate monitor device is consistent throughout an activity, all activities, and between devices. Another assumption is that user intensity for each activity is the same such that heart rate increases are due to monitoring differences rather than increased workout intensity. PPG signal will also be assumed to only have components of cardiac (i.e. heart rate) signals and non-cardiac noise signals. These assumptions allow for heart rate output due to device position and activity to be determined.

Solve

Solving the problem of heart rate monitor outputs varying based on user activity and device position first requires an understanding of which device placements respond to different activities. This data is collected from users wearing monitors in different positions and engaging in different activities. It has been determined that wrist-based measurements respond better to walking and running activities than forearm measurements while forearm measurements respond better to cycling activities than wrist measurements (Figure 3). Both respond well to rest [2].

Next, an analysis of the PPG signal generated for each device placement and each activity can be completed. This allows for the determination of frequencies that are characteristic of noise in each of these activities. For example, since cycling creates more noise in wrist measurements than forearm measurements, the PPG signals of each of these measurements can be compared to determine what is present in the wrist signal that is not present in the forearm signal. This discrepancy, say frequency A, is noise generated in wrist measurements due to cycling motion.

Performing this analysis on a large data set of heart rate measurements over different device placements and user activities allows for the identification of noise frequencies characteristic of certain user activities. In designing a heart rate monitor device, these frequencies can be programmed to be filtered out based on the activity being completed. For example, a user can select “cycling” on their wrist based heart rate monitor prior to beginning exercise and the device will then apply the filter to remove frequency A noise from the data, producing heart rate data just as accurate as a forearm monitor. Designing devices such that noise can be correctly identified and removed will allow multisport athletes to gain reliable heart rate data regardless of activity and without having to move their device on their arm.

This solution is reasonable, however determining exact frequencies characteristic of certain activities would require large data sampling since there is much individual variation in heart rate. Limitations stem from assumptions mentioned above, as user intensity is often not constant across activities and emitted light intensity may change throughout an activity as the device moves closer and farther from the user’s skin due to motion.

References

[1]       P. R. MacDonald and C. J. Kulach, “Heart Rate Monitoring with Time Varying Linear Filtering,” US 9801587 B2, 2017.

[2]       J. Parak and I. Korhonen, “Evaluation of wearable consumer heart rate monitors based on photopletysmography,” 2014 36th Annu. Int. Conf. IEEE Eng. Med. Biol. Soc. EMBC 2014, pp. 3670–3673, 2014, doi: 10.1109/EMBC.2014.6944419.

[3]       J. L. Cheng, J. R. Jeng, and Z. W. Chiang, “Heart rate measurement in the presence of noises,” 2006 Pervasive Heal. Conf. Work. PervasiveHealth, 2006, doi: 10.1109/PCTHEALTH.2006.361651.

[4]       D. F. Swinehart, “The Beer-Lambert law,” J. Chem. Educ., vol. 39, no. 7, pp. 333–335, 1962, doi: 10.1021/ed039p333.


Identify, Formula, Solve: Patient Positioning and ADP

Identify the Problem

Air Displacement Plethysmography (ADP) is a simple, formula-based approach used to determine one’s body composition. Body composition is used to determine physiological health risks of individuals that may be related to weight. It is very important that all results presented by ADP are accurate, in order to ensure that the patient and clinician are receiving correct information regarding the patient’s health. 

Raw body volume can easily be determined by measuring the amount of air displaced from the chamber, but there are other factors that can affect body volume measurements that must be accounted for. It’s incredibly important that all potential sources of error are minimized to ensure for the most accurate calculations of body composition. Sources of isothermal air within the measurement chamber can lead to an underestimation of body volume because isothermal air is more compressible than air in adiabatic conditions. This underestimation in volume can lead to an overestimation in body density and an overestimation of percent fat. [1] One source of isothermal air is air that is on or near skin and clothing, which is represented by Surface Area Artifact (SAA). This accounts for a small constant, k, as well as the body surface area of the individual. Another source of isothermal air is thoracic gas volume (VTG), which is measured at mid-exhalation through pulmonary plethysmography or it is estimated by ADP. Research has shown that 40% of VTG has an impact on body volume. [1] Here is the formula for the corrected body volume determined through ADP: 

VBcorrected = VBraw – SAA + .4*TVG

Another design aspect of the device that has speculated to alter calculations is patient positioning. The current testing procedure requires subjects to sit up straight in the measurement chamber, but what if they were bent over? How would the change in position change body composition calculations? The aspect of patient positioning could affect VTG because individuals in the bent over position may show different breathing patterns, which would impact VTG. A study that analyzed the effects of body positioning on ADP measurements found that there was a slight difference in VTG between individuals sitting in the straight up and bent over positions, so we will be using some of their data in this problem. [2]

Here is the engineering problem I propose: Using the densitometric principles of ADP, hand calculate the % body fat of an individual sitting straight up, and then calculate the % body fat of the same individual in the bent over position. Does the position of the patient have a significant impact on % body fat calculations?

Formulate Problem 


We want to assume mostly adiabatic conditions within the measurement chamber. This means Poisson’s Law should be used to determine the volume of air within the chamber. The formula below, initial conditions of the chamber, and the given values below should be used to calculate the volume of air in the chamber. Initial conditions are those of an empty chamber, and then an individual sits in the chamber, which changes the pressure and volume in the chamber. 450L is the volume of air in an empty chamber and the change in pressure is caused the presence of a body in the chamber and the pressure values remain in the acceptable range for ADP. [3] Y represents the specific heat capacity of the air within the chamber at the designated temperature. [4] All pressure and volume values were estimated based on typical characteristics and conditions of ADP. [3,4]

(P1V1)^Y = (P2V2)^Y

P1 = 75 kPa, P2 = 88.4 kPa, V1 = 450 L, V2 = ?, Y= 1.401 @ 25°C

For the sake of this problem, let’s assume that surface area artifact can be ignored. The formula for SAA is SAA= k x BSA, where k is a constant derived by a manufacturer and BSA is body surface area. A typical value used for k is -4.7 x 10⁻⁵. Since this value is very small, it will result in a surface area artifact that is also very small. [1,2] Therefore, the new formula for corrected body volume is:

VBcorrected = VBraw + .4*TVG

We also want to assume for the presence of some isothermal air within the chamber that is caused by thoracic gas volume in each scenario. An ADP related study looked at the difference in VTG between a person sitting straight up and a person bent over in a chamber. [2] We can use their average determined values here in our problem.

VTGstraight = 4.517 L, VTGbent = 4.445 L

Here is some more information and assumptions needed to solve the problem: 

  • The mass of the individual is 74kg and the same individual is tested in both cases 
  • Assume the subject has consistent breathing rates during testing 
  • Assume the temperature within ADP remains at 25°C [3]
  • Assume the change in positioning does not impact body volume 
  • Body Density = Body Mass / Body Volume [1]
  • Use Siri’s Equation (below) to determine body fat % in both cases [1]
    • % fat mass= [(4.95/Density)-4.5]*100 
  • Assume the patient is in the positions according to the figure below. “A” represents the subject bent over and “B” represents the patient sitting straight up. [2]

Solve the Problem 

  1.   Determine the volume of air within the measurement chamber when a subject enters the     chamber using Poisson’s Law.

    (P1V1)^Y = (P2V2)^Y

    P1 = 75 kPa, P2 = 88.4 kPa, V1 = 450 L , V2 = ?= 1.401 @ 25°C

    (75*450)^1.401 = (88.4*V2)^1.401

    33750 = 88.4V2

    V2 = 381.88 L

  2. Find the air displaced from the measurement chamber and equate it to raw body volume.

    V1 – V2 = Vdisplaced = VBraw

    450 L – 381.88 L = 68.2 L = Vdisplaced = VBraw

  3.  Find the corrected body volume of the individual in each position.

    Bent: VBcorrected = VBraw + .4*TVG = 68.2 L + (.4*4.445 L) = 69.978 L 

    Straight: VBcorrected = VBraw + .4*TVG = 68.2 L + (.4*4.517 L) = 70.007 L

  4. Find the body density of the individual in each position.

    Bent: BD=BM/BV= 74 kg / 69.978L = 1.0574 kg/L

    Straight: BD=BM/BV= 74 kg / 70.007 = 1.0570 kg/L

  5. Use Siri’s Equation to find the % fat mass of the individual in each position.

    Bent: % fat mass= [(4.95/Density)-4.5]*100 = [(4.95/1.0574)-4.5]*100 = 18.13 % fat mass 

    Straight: % fat mass= [(4.95/Density)-4.5]*100 = [(4.95/1.057)-4.5]*100 = 18.31 % fat mass

Answer:

The percent body mass for the individual in the bent position is 18.13% and the percent body mass for the individual in the straight position in 18.31%. There is a small difference between the two positions, which does support the findings of the study that the values were based off of. However, it is still important that the sitting position of the individual is standardized across all testing procedures to decrease variability in testing results. Limitations of the results include not accounting for surface area artifact and estimations of VTG using ADP technology. 

References:

  1. David A Fields, Michael I Goran, Megan A McCrory, Body-composition assessment via air-displacement plethysmography in adults and children: a review, The American Journal of Clinical Nutrition, Volume 75, Issue 3, March 2002, Pages 453–467, https://doi.org/10.1093/ajcn/75.3.453
  2. Peeters M. W. (2012). Subject positioning in the BOD POD® only marginally affects measurement of body volume and estimation of percent body fat in young adult men. PloS one, 7(3), e32722. https://doi.org/10.1371/journal.pone.0032722
  3. COSMED. The World’s Gold Standard for Fast, Accurate and Safe Body Composition Assessment. COSMED USA Inc., 2019. https://www.cosmed.com/hires/Bod_Pod_Brochure_EN_C03837-02-93_A4_print.pdf
  4. Engineering ToolBox, (2003). Specific Heat Ratio of Air. Available at: https://www.engineeringtoolbox.com/specific-heat-ratio-d_602.html 

Calorie Counting Using Pedometers

Identify

Pedometers can be beneficial in increasing physical activity by providing real-time feedback to users. Step count, distance traveled, and calories burned are often recorded by pedometers, allowing users to set the fitness goals and see if they are achieving them. Accelerometer pedometers are shown to be more accurate in counting steps than traditional mechanical pedometers, Distance traveled is based on the stride length of the user and step count, which can be calculated using the data collected by the pedometer. Some pedometers also provide a number for calories burned, but how accurate is this value and how is it calculated? The accuracy of this quantity may be beneficial for users who are basing their daily caloric intake on the amount of calories they believe they have burned. The current formula used to determine calories burned is: total calories burned = Duration (in minutes)*(MET*0.0175*weight in kg). MET is a value based on the intensity of the exercise being performed, as can be seen in the chart depicted on the Hospital for Special Surgery website [1]. How to accurately measure calories burned using a pedometer has not been determined. Heart rate can be a good way to determine intensity of exercise but not all pedometers include heart rate monitors. Some pedometers use the calculated speed of the user and their weight to estimate calories burned [2]. Studies have shown that calories burned is often underestimated when using a pedometer. Compared to metabolic data collected during exercise from VO2, the pedometer calorie count, that utilized weight, number of steps, stride length, and speed of the user, was lower [3]. The solution I propose is to implement a peak detection system that takes into account the amplitude of the acceleration waveform to correlate this to METs and calories burned. 


Formulate

Most accelerometer pedometers utilize an adaptive peak detection system to distinguish extraneous movements from steps. A peak detection system is implemented to determine if a peak in the acceleration waveform should actually count as a step. An amplitude for the peak and a time threshold for the wave are used to determine if the movement qualifies as a step. When the required conditions are met, the step is counted and the system begins to search for the next peak in the acceleration data [4]. However, other than determining if the threshold value is met, the amplitude of the peak is not utilized. I propose that using the amplitude could provide a more accurate way of determining the intensity of the movement and could be applied to the calculation of calories burned. Although this will not be completely accurate, I believe that this would improve on the current method used in some pedometers to calculate calories burned. Pedometers that have heart rate monitors can use this data to more accurately predict energy expenditure but pedometers that do not often use crude calculations such as calories/kg/hr = 1.25 x speed (km/h) or calories/hr = 1 x weight (kg) while resting [2]. If the amplitude data can be stored and processed, this information could be correlated to METs, which may improve accuracy in energy expenditure data. 

Figure 1. Sample magnitude values that are found using data collected from the x, y, and z axis of the accelerometer during movement.[5]

Solve

In order to implement the peak magnitude system, the magnitude of all 3 axes could be found prior to filtering. Using the equation mag = sqrt(x^2+y^2+z^2), the overall magnitude of acceleration could be found for each movement. This data can then be filtered and smoothed returning a similar pattern as seen in figure 1 [5]. A peak detection system functions by analyzing time periods and determining where the peak falls within that interval. When a peak is detected that fulfills the magnitude threshold and time threshold, the pedometer tracks a step. If the magnitude of the peak can be stored, this could be used to determine the MET value of an activity. METs range from 1 – 23, 1 occurring when you are sitting at rest and 23 occurring during extremely vigorous exercise, such as running at a 4:30 mile pace [6].

Figure 2. Sample block diagram created in Simulink that could be used to calculate calories burned based on assigned MET values relating to different magnitudes of acceleration.

A block diagram, as seen in figure 2, could be used to correlate the magnitude to the intensity of exercise. This potential solution to the inaccuracies of energy expenditure calculated by pedometers still has some limitations. One limitation being that not all intense exercises will generate high acceleration values despite the large caloric expenditure. For example, squatting a one rep max may require a great deal of energy, but the pedometer may not pick it up as movement and therefore would not count it as a step. This is an example of where heart rate monitors may be beneficial in determining energy expenditure. Similarly, exercising on a stationary bike may be very intense but not trigger any steps to be counted if the pedometer is worn on the wrist and therefore would not be counted in the overall calorie burn for the user. This assumption that acceleration correlates directly to exercise intensity may accurately apply in all cases, but it could still improve the overall calculation of calories burned.    


References:

  1. Women’s Sports Medicine Center, Hospital for Surgery. (2009). Burning Calories with Exercise: Calculating Estimated Energy Expenditure. Retrieved from https://www.hss.edu/conditions_burning-calories-with-exercise-calculating-estimated-energy-expenditure.asp.
  2. Zhao, N. (2010). Full-Featured Pedometer Design Realized with 3-Axis Digital Accelerometer. Analog Dialogue, 44(6)
  3. Smith, K., Egercic, L., Bramble, A., Secich, J. (2017) Reliability and validity of the Omron HJ-720 ITC pedometer when worn at four different locations on the body, Cogent Medicine, 4:1
  4. Ravindran, S. (2013). US Patent No. US 2013/0191069A1. Retrieved from https://patents.google.com/patent/US20130191069?oq=intitle%3Aadaptive+intitle%3Astep+intitle%3Adetection
  5. Alabadleh, Ahmad & Hawari, Eshraq & Alkafaween, Esra’a & Alsawalqah, Hamad. (2017). Step Detection Algorithm For Accurate Distance Estimation Using Dynamic Step Length. 324-327.
  6. Mcall, P. (2017). 5 Things to Know About Metabolic Equivalents. Retrieved from https://www.acefitness.org/education-and-resources/professional/expert-articles/6434/5-things-to-know-about-metabolic-equivalents/

The path of least impedance

Identify 

I am sure most of you are familiar with the term Body Mass Index (BMI), and some of you may have even received one. Also, I am sure most of you are familiar with the controversy regarding the accuracy of BMIs. Unfortunately, BMI results do not accurately reflect the body fat percentage of certain populations, such as athletes and the elderly, because muscle mass is not taken into account [1]. For example, an athlete with significant muscle mass would report as overweight and an older individual lacking muscle mass would report as underweight [1]. In hopes of correcting the inaccuracies stemming from BMI calculations, bioelectrical impedance analysis (BIA) became a popular method for measuring body fat mass and body fat percentage.

With BIA, a small, alternating current is sent throughout the body and the impedance of electrical current to fat, water, and muscle content is recorded [2]. Fattier tissues will reduce the speed of electrical current whereas hydrated and muscular tissues will not [3]. Assuming that the body exists as a conductive cylinder uniform in material and density, allows for these impedance measurements to be easily converted into body composition measurements [4]. However, due to these assumptions, inaccuracies persist and an advantage of BIA over BMI remains unclear. BIA has the potential of providing more accurate and reliable results, but that must start with correcting the issues that result from its assumptions, more specifically its assumption that the body exists as a conductive cylinder.

Preliminary bioelectrical impedance analyzers made use of a one-cylinder model to make body composition measurements [5]. Unfortunately this method led to the underestimation of total body water, thus, leading to inaccurate results of body fat mass and lean body mass (Figure 1) [5]. To improve upon this issue, the 5-cylinder model was developed which makes cylinders out of the arms, legs, and trunk (Figure 1) [5]. In addition, the 5-cylinder model was able to expand upon its predecessor by providing detailed reports of each body part’s composition and whole-body composition [5].

Figure 1. Schematic of a one-cylinder model versus a 5-cylinder model [5].

In Calculus we learned that when approximating the area under the curve our estimation yields better results when we add more rectangles with smaller widths. Analogous to the previous scenario, our body composition measurements would prove to be more accurate by increasing the number of cylinders our body could model. Instead of using one cylinder, it may be more beneficial to have 5 cylinders.

Formulate

To measure impedance among 5 cylinders requires more electrodes than the four that come with conventional BIA (Figure 2) [6]. Moreover, for the 5-cylinder model, all alternating current is supplied between the right ankle and right wrist [6]. To measure the potential difference of the upper limbs, lower limbs, and trunk, the electrodes are placed between the right and left wrist, right and left ankle, and left ankle and wrist, respectively [6]. All electrodes pairs are then attached to a four-channel, battery operated impedance instrument that reports the resistance, reactance, phase angle, and impedance [6].

Figure 2. 5-cylinder model electrode placement schematic [6].

In order to calculate impedance, the resistance, R, reactance, Xc, and phase angle must be known (Equation 1) [7]. Resistance is reflective of electrolyte-containing total body water in which lean muscles tend to have low resistance and fattier tissues tend to have a high resistance [7]. Reactance is reflective of body cell mass in which a higher proportion of cells gives rise to low reactance and a lower proportion of cells gives rise to a high reactance [7]. The phase angle readout is a component of the impedance instrument that allows for differentiation between resistance and reactance [7].

Z^2 = R^2 + Xc^2                        Equation 1

Now that we know how to calculate impedance, we must now relate impedance to total body water (TBW) shown in Equation 2 [6].

TBW = L^2/Z                            Equation 2

L: length of cylinder

Z: impedance of cylinder

To make use of these equations while maintaining full transparency, we must clarify the assumptions. Therefore, we assume:

  1. The supplied current follows the path of least resistance.
  2. The body is made up of segmental conductive cylinders [6].
  3. The total body water occupies a cylinder of length, L, and is uniform in resistivity (Equation 2) [6].

By assuming the path of least resistance we can exclude extraneous and complex equations that would otherwise be needed to solve for resistance. Secondly, by assuming segmental conductive cylinders, we can analyze a body part’s contribution to whole body impedance. Lastly, by assuming what is shown in Equation 2 we can again exclude extraneous and complex equations that would otherwise be needed to solve for TBW.

Solve

With this segmented approach, we can better estimate lean body mass (LBM) and fat mass (FM) by recording the individual lengths and resistivities of upper limb, lower limb, and trunk cylinders (Equation 3). Whereas for a one-cylinder model, the entire body was assumed to have one resistivity, which is inherently untrue considering the trunk and limbs distribute lean muscle and fat differently [6]. Unfortunately, even through a segmented approach of solving for TBW, reliability of Equation 2 is questionable which continues into Equation 3 [6]. Studies have shown that impedance, Z, contributes little to solving for lean body mass (LBM). Moreover, changes in impedance showed little to no change in LBM [6].

TBW = Lᵤₗ^2/Zᵤₗ + Lₗₗ^2/Zₗₗ + Lₜ^2/Zₜ                Equation 3

ul: upper limb

ll: lower limb

t: trunk

Despite its reliability being under question, we continue to make use of assumptions to simplify equations while maintaining some degree of accuracy. Moreover, now that we know TBW, we can solve for LBM and fat mass (FM) through the empirical estimations shown in Equation 5 and Equation 4 [7]. These empirical estimations are based on observations of human biological phenomena where on average a human’s lean body mass contains 73% of their total body water [7]. Because we are not all the same, deviations from Equation 4 do exist, which is a limitation of using empirical calculations.

LBM = TBW/0.73                        Equation 4

FM = Body Mass – LBM                    Equation 5

Although the segmental approach improves accuracy in comparison to the one-cylinder model, discrepancies still exist through the use of assumptions and empirical estimations. To further improve upon BIA, it is important that we rid of all empirical estimations and analyze impedance solely on the person. Fortunately, companies like InBody have made strides in improving this technology by minimizing the use of empirical estimations [5].

References

  1. Assessing Your Weight and Health Risk. NIH. Website. https://www.nhlbi.nih.gov/health/educational/lose_wt/risk.htm. Accessed May 1, 2020.
  2. Grossi, M., Ricco, B. Electrical impedance spectroscopy (EIS) for biological analysis and food characterization: a review. J Sens Sens Syst. 2017; 6: 303-325. https://doi.org/10.5194/jsss-6-303-2017.
  3. Bioelectrical Impedance Analysis (BIA). Science for Sport. Website. https://www.scienceforsport.com/bioelectrical-impedance-analysis-bia/. Published May 20, 2018. Accessed February 27, 2020.
  4. Dehghan, M., Merchant A.T. Is bioelectrical impedance accurate for use in large epidemiological studies? Nutr J. 2008; 7: 36. doi: 10.1186/1475-2891-7-26
  5. Revolutionizing BIA Technology with InBody. InBody. Website. https://inbodyusa.com/general/technology/. Accessed May 12, 2020.
  6. Organ LW, Bradham GB, Gore DT, Lozier SL. Segmental bioelectrical impedance analysis: theory and application of a new technique. Journal of Applied Physiology. 1994 Jul; 77(1): 98-112.
  7. Bioelectrical Impedance Analysis (BIA) and Body Composition Analyse. DANTEST Media Inc. Website. http://www.dantest.com/dtr_bioscan_bia.htm. Accessed May 12, 2020.


What’s the Scoop on Cupping?

My first exposure to cupping was seeing the perfectly circular bruises on Michel Phelp’s during the 2016 Summer Olympics. Since then, I have come across it many times in the University of Delaware athletic training room seeing athletes performing exercises with cups suctioned to their back. I have even tried it myself a couple of times to see what the hype was about and if I felt a difference using this type of recovery method. 

Figure 1. Michael Phelps swimming with visible cupping markers (bruises) on his shoulders. 

Now if you haven’t heard about cupping you may be wondering: what is cupping? Cupping is the application of plastic, glass, bamboo, or ceramics cups [1] to the skin via suction. The suction can either be created naturally by heating up the inside of the cup using a flame and allowing it to cool on the skin creating negative pressure and lifting/stretching the skin up. The other way to get this pressure is to use a suction device.[1] There are also two types of cupping, similar to needling; there are both wet and dry methods. Dry cupping is exactly the procedure I described above while wet cupping is when small cuts are made on the skin before the cup is applied and blood is drawn out. [1] The original idea behind this technique was that it was regulating Qi in the body. More recently, people claim that it promotes blood flow and therefore has a positive effect on the healing process, reducing soreness and pain. There are still many who find cupping bizarre and disgusting due to the often dark bruising and the odd look of the skin suctioned into cups. In particular, a Forbes article by Steven Salzberg goes as describes it as “someone giving you a massive hickey, and then doing another dozen or so all over your back, or legs, or wherever ” [2]. So by now, you should have a pretty clear image that while there are many advocates and cupping has been gaining interest (especially if professional athletes on the world stage have used it), there are still many skeptics and people who say it is harmful. Let’s see exactly what the research says about cupping. Is it beneficial? Harmful?


An article published in The Journal of Alternative and Complementary Medicine by a group of Australian and German researchers performed a systematic meta-analysis of clinical trials evaluating the effects of cupping on athletes. [3] They found 11 valid (according to their criteria) trials with a combined total of 498 participants from China, the United States, Greece, Iran, and the United Arab Emirates. Participants received cupping 1 to 20 times in daily or weekly intervals either alone or in combination with another procedure, like acupuncture.[3] The study found no conclusive results however. Even though there were improvements to the participant’s perception of pain, an increased range of motion, and lower levels of creatine kinase, there were large variations between symptom intensity and recovery measures, and other metrics.[3] There are also some limitations to this study. One of the main concerns is the reliability of the data. The researchers report an unclear or high risk of bias in many of the trials and they also mention that none of the trials reported safety. 


Another study published in 2016 in the Journal of Novel Physiotherapies evaluated the effects of various soft tissue mobilization techniques, including cupping, on active myofascial trigger-points in 20 amateur soccer players.[4] Athletes received cupping once a week for three weeks. They found that all techniques used, including cupping, improved pain pressure threshold and pain sensitivity significantly. [4] The researchers concluded that more research must be done to fully be able to draw a conclusion. Some limitations of the study were the small sample size (n = 20) and that the study was limited to only amateur soccer players. Other studies, including the previously mentioned study viewed multiple different sports instead of one. This also provided a much larger sample size compared to this study.  


Overall, there appears to be no definite answer, at least at this time, on if cupping helps promote healing and reduce pain and muscle soreness. For some, it appears to be beneficial in relieving pain but due to a limited number of studies and the questionable accuracy of others, there is no conclusive data for or against cupping. As the first-mentioned study by Bridgett et. al stated, “ No explicit recommendation for or against the use of cupping for athletes can be made. More studies are necessary for conclusive judgment on the efficacy and safety of cupping in athletes.” [3].


References:

[1] NCCIH. “Cupping.” November 2018. Retrieved from: https://www.nccih.nih.gov/health/cupping

[2] Steven Salzberg. “ The Ridiculous and Possibly Harmful Practice of Cupping”.  May 2019. Retrieved from: https://www.forbes.com/sites/stevensalzberg/2019/05/13/the-ridiculous-and-possibly-harmful-practice-of-cupping/#57ce2d2331f3

[3] Rhianna Bridgett, Petra Klose, Rob Duffield, Suni Mydock, and Romy Lauche.The Journal of Alternative and Complementary Medicine.Mar 2018. 208-219.http://doi.org/10.1089/acm.2017.0191

[4] Fousekis, Konstantinos et al. “The Effectiveness of Instrument-assisted Soft Tissue Mobilization Technique(Ergoné Technique), Cupping and Ischaemic Pressure Techniques in the Treatment of Amateur AthletesàMyofascial Trigger Points.” (2016).


Questions to Consider:

  1. Have you ever gotten cupping done? If yes, what are your thoughts? Did you find it beneficial? If no, was there a reason why?
  2. How do you think studies looking at cupping should compare its effects for the most accurate evaluation? Should they compare across different sports because the benefits should not be sport dependent or within one sport to get a better comparison?

To Stretch or Not To Stretch

Stretching is regularly included in exercise regimes by athletic trainers and coaches and is often recommended to novice athletes. The chronic effects of stretching result from consistent practice and are thought to be a preventative measure to reduce risk of injury by increasing flexibility to increase overall range of motion. [1] This increased range of motion is thought to increase overall performance. However, those against stretching argue the long-term effects could lower performance by decreasing muscle strength.

Types of Stretching

Three common types of stretching include static, dynamic, and proprioceptive neuromuscular facilitation (PNF). [2] Static stretching involves lengthening a specific muscle group for a period of time without movement. This method is arguably the safest form of stretching, especially for beginners, as it minimizes the risk of tearing or straining the muscle by overstretching. [3] PNF incorporates static stretching in addition to isometric contraction and relaxation of the muscle. Unlike static and PNF methods, dynamic stretching involves active movements to increase the range of motion while raising the heart rate before an exercise.

Mechanisms to Increasing Flexibility

Several mechanisms describe how stretching can increase flexibility over time including increasing compliance and increasing stretch tolerance. Compliance relates to the elasticity of the muscle-tendon unit and is useful in generating forces as elastic energy is stored by eccentric contractions during the stretch-shortening cycle (SSC). [4] Stretching can increase the compliance of the muscle-tendon, increasing the energy potential. Increasing the stretch tolerance of a muscle is a second mechanism to increase flexibility. Long-term stretching can alter how the central nervous system receives signals from structures aiding in proprioception and regulation of muscle stiffness including nociceptors, Golgi tendon organs, and muscle spindles. [5] Altering these signals may result in greater ranges of motion with decreased resistance by the nervous system.

Stretching Reduces Injury in Some Sports

Research has shown that stretching can reduce injury by increasing flexibility, but only in some sports. For sports requiring jumping motions that involve high intensity SSCs, like soccer and football, stretching has been shown to reduce injury. [4] In these sports, the muscle-tendon system works as an elastic spring. With a compliant unit, potential injury is reduced as greater energy can be absorbed by the tendon, sparing the muscle fibers potential damage. However, if the tendon has low compliance greater forces can be transferred to the muscle, resulting in injury if the muscle is unable to support high amounts of energy.

A prospective study published in 2003 from Ghent University measured initial muscle flexibility for 146 male professional soccer players and analyzed how flexibility related to the development of muscle injuries throughout the season. Goniometers were used to measure the flexibility of the hamstring, quadriceps, adductor, and gastrocnemius muscles on both sides of the athletes. The study reported no statistical significance between players height and weight, but did not analyze other factors like age. Throughout the season, 67 players were diagnosed with a lower extremity injury. For the hamstring and quadriceps muscle, the injured group had a significantly lower initial mean flexibility. No significant difference for flexibility was found for injuries involving the adductor or gastrocnemius muscles which could be due to the low power of this analysis. Thus, this study recommends implementing a stretching program to prevent muscle injuries, although there are many limitations. This study only analyzed intrinsic muscle flexibility when muscle injury can be caused by many intrinsic and extrinsic risk factors. Also, the specific circumstances of the injuries were not incorporated in analysis. [6]

Unlike sports involving high intensity SSCs, there is insufficient evidence that stretching is effective in preventing injury in sports with lower intensity SSCs, including cycling and swimming, as well as jogging (which utilizes high intensity SSCs, but not at maximum exertion). [4,7] Rather than utilizing the ability to absorb energy, these sports utilize the conversion of metabolic energy into mechanical work by concentric contractions. [4]

Can Stretching Increase Performance?

Although long-term stretching can increase range of motion, this does not always mean an increase in performance.  A 2007 study investigated the long-term effects of PNF and static stretching on range of motion and jump performance. Twenty-three healthy male volunteers were randomly divided into 3 groups to follow a static stretching program, PNF stretching program, or a control group with no stretching. Range of motion was recorded by a goniometer. Jump performance was measured by timing a subject dropping from a box onto a contact mat and jumping as high as possible to then calculate jump height. Measurements were recorded at the beginning and end of the study. While no group had any significant change in jump performance, both stretching groups had a significant increase in joint range of motion. The authors believe measuring muscle hypertrophy could have been a better measure of performance. [8]

Does Stretching Decrease Performance?

Stretching is not always recommended for sports involving lower intensity SSCs because a muscle-tendon system that is too compliant could reduce performance. For these sports, decreased flexibility with greater stiffness can contribute to more rapid tension changes for faster responses. [4] A 2001 study investigated the effects of stretching on 16 male and 16 female college aged runners. At the beginning and end of the study VO2peak, running economy, and flexibility, measured by a sit and reach test, was evaluated. Running economy is used to evaluate running performance as a measure of VO2 and the respiratory exchange ratio. [9] The participants were randomly assigned to a stretching or non-stretching group and followed these programs for 10 weeks. The stretching group performed 15 static stretches in a 40 minute session for 3 days a week for the 10 weeks of the study. This study found an increase in flexibility in the stretching group, but no significant change in running economy for both the stretching or the non-stretching group. Stretching does not appear to increase or decrease running performance, and thus may not be harmful to incorporate in these sports. However, limitations to this study include the limited measurements of flexibility provided by the sit and reach test, as well as potential confounding factors that can affect running economy. [10]

Although acute stretching often results in decreased muscle strength, longer-term effects of stretching may actually promote muscle hypertrophy. A 2013 study analyzed the effect of stretching before a strength training workout and found that strength levels increased for both the stretching and non-stretching groups, although the group without stretching had a greater increase. [11]

To Stretch or Not To Stretch?

Overall, the long-term effects of stretching include increased flexibility which can reduce injury in sports with high intensity SSCs. Although stretching has not been found to decrease the risk of injury in sports with low intensity SSCs, it does not lower performance. The studies discussed did not find that stretching enhanced or reduced performance, but this may be due to influences to muscle hypertrophy that were not included in these studies. As long as stretching is performed utilizing proper techniques to prevent overstretching, incorporating stretching into your workout can be beneficial and help increase flexibility overtime.

Questions to Consider

  1. Do you regularly stretch? If so, do you prefer stretching before, after, or before and after your workout? In your own experiences have you noticed any effects from stretching versus not stretching?
  2. What do you think about the different methods to measure flexibility (goniometry, sit and reach test)? How might the limitations of each of these methods influence results and conclusions made by studies? If you are unfamiliar with sit and reach tests, check out this video. Is there a better way to measure flexibility?
  3. Do you think the duration of stretching for the stretching protocols in these studies is important to consider? Do you think these protocols should be standardized across studies (such as types of stretches performed or muscles that are targeted by stretching for certain sports)?

References

[1] Stone M, Ramsey MW, Kinser AM, O’Bryant HS, Ayers C, Sands WA. Stretching: acute and chronic? the potential consequences. Strength and conditioning journal. 2006;28(6):66-66. doi:10.1519/1533-4295(2006)28[66:SAACTP]2.0.CO;2.

[2] Mann D, Whedon C. Functional stretching: implementing a dynamic stretching program. Athletic therapy today. 2001;6(3):10-13. doi:10.1123/att.6.3.10

[3] Muniz Medeiros D, Martini T. Does Stretching Have Long-Term Effects on Muscle Performance? A Clinical Commentary. J Yoga Phys Ther. 2017;7(2). doi:10.4172/2157-7595.1000269

[4] Witvrouw E, Mahieu N, Danneels L, McNair P. Stretching and injury prevention : an obscure relationship. Sports Med. 2004;34(7):443-449. doi:10.2165/00007256-200434070-00003

[5] LaRoche D, Connolly D. Effects of stretching on passive muscle tension and response to eccentric exercise. The American Journal of Sports Medicine. 2006;34(6):1000-1007. doi:10.1177/0363546505284238

[6] Witvrouw E, Danneels L, Asselman P, D’Have T, Cambier D. Muscle flexibility as a risk factor for developing muscle injuries in male professional soccer players. a prospective study. The American Journal of Sports Medicine. 2003;31(1):41-46. doi:10.1177/03635465030310011801

[7] Yeung EW, Yeung SS. A systematic review of interventions to prevent lower limb soft tissue running injuries. Br J Sports Med. 2001; 25: 383-9. doi:10.1136/bjsm.35.6.383

[8] Yuktasir B, Kaya F. Investigation into the long-term effects of static and pnf stretching exercises on range of motion and jump performance. Journal of Bodywork & Movement Therapies. 2009;13(1):11-21. doi:10.1016/j.jbmt.2007.10.001

[9]Nelson AG, Kokkonen J, Eldredge C, Cornwell A, Glickman-Weiss E. Chronic stretching and running economy. Scandinavian Journal of Medicine & Science in Sports. 2001;11(5):260-265. doi:10.1034/j.1600-0838.2001.110502.x

[10] Saunders PU, Pyne DB, Telford RD, Hawley JA. Factors affecting running economy in trained distance runners. Sports Med. 2004;34(7):465–485. doi:10.2165/00007256-200434070-00005

[11] Borges Bastos CL, Miranda H, Vale RG, et al. Chronic effect of static stretching on strength performance and basal serum igf-1 levels. Journal of Strength and Conditioning Research. 2013;27(9):2465-2472. doi:10.1519/JSC.0b013e31828054b7