
Target Grades: 2nd-8th
Schedule: 30-90 minutes depending on grade
Next Generation Science Standards
2-PS1-1 thru 2-PS1-2, 2-PS1-4 – Structure and Properties of Matter
- 2-PS1-1: Plan and conduct an investigation to describe and classify different kinds of materials by their observable properties.
- 2-PS1-2: Analyze data obtained from testing different materials to determine which materials have the properties that are best suited for an intended purpose.
- 2-PS1-4: Construct an argument with evidence that some changes caused by heating or cooling can be reversed and some cannot
K-2-ETS1-1 thru K-2-ETS1-3 – Engineering Design
- K-2-ETS1-1: Ask questions, make observations, and gather information about a situation people want to change to define a simple problem that can be solved through the development of a new or improved object or tool.
- K-2-ETS1-2: Develop a simple sketch, drawing, or physical model to illustrate how the shape of an object helps it function as needed to solve a given problem.
- K-2-ETS1-3: Analyze data from tests of two objects designed to solve the same problem to compare the strengths and weaknesses of how each performs.
5-PS1-1 thru 5-PS1-3 – Structure and Properties of Matter
- 5-PS1-1: Develop a model to describe that matter is made of particles too small to be seen.
- 5-PS1-2: Measure and graph quantities to provide evidence that regardless of the type of change that occurs when heating, cooling, or mixing substances, the total weight of matter is conserved
- 5-PS1-3: Make observations and measurements to identify materials based on their properties.
3-5-ETS1-1 thru 3-5-ETS1-3 Engineering Design
- 3-5-ETS1-1: Define a simple design problem reflecting a need or a want that includes specified criteria for success and constraints on materials, time, or cost.
- 3-5-ETS1-2: Generate and compare multiple possible solutions to a problem based on how well each is likely to meet the criteria and constraints of the problem.
- 3-5-ETS1-3: Plan and carry out fair tests in which variables are controlled and failure points are considered to identify aspects of a model or prototype that can be improved.
MS-PS1-1 thru MS-PS1-4 Structure and Properties of Matter
- MS-PS1-1. Develop models to describe the atomic composition of simple molecules and extended structures.
- MS-PS1-3. Gather and make sense of information to describe that synthetic materials come from natural resources and impact society.
- MS-PS1-4. Develop a model that predicts and describes changes in particle motion, temperature, and state of a pure substance when thermal energy is added or removed.
MS-ETS1-1 thru MS-ETS1-4 Engineering Design
- MS-ETS1-1. Define the criteria and constraints of a design problem with sufficient precision to ensure a successful solution, taking into account relevant scientific principles and potential impacts on people and the natural environment that may limit possible solutions.
- MS-ETS1-2. Evaluate competing design solutions using a systematic process to determine how well they meet the criteria and constraints of the problem.
- MS-ETS1-3. Analyze data from tests to determine similarities and differences among several design solutions to identify the best characteristics of each that can be combined into a new solution to better meet the criteria for success.
- MS-ETS1-4. Develop a model to generate data for iterative testing and modification of a proposed object, tool, or process such that an optimal design can be achieved.
Objectives
- Explain types of fracturing, ductile and brittle, and why engineers might want to know how a material fractures and when
- Explain what a composite is and how it is formed, and discuss how and why techniques, like VARTM, are used to improve composites
- Discuss the composition of the Hershey’s miniatures, using what they have just learned about composites, and encourage the kids to predict how the chocolate might fracture.
Vocabulary
- Composites, physical property, chemical property, fracture, ductile, brittle, stress, fiber, resin, voids, conservation of mass, hardness, compressive strength, chemical bond, single bond, double bond, aromatic rings, polymorph, batch reactor, thermocouple, temper, iteration
Materials (per student) –
*additional materials required for engineering builds – see below*
- Miniature Hershey’s Dark Chocolate (or any small dark chocolate bar)
- Miniature Krackel (or any chocolate rice crispy)
- Miniature Air Head (warmed)
- Gloves
- Safety glasses
Procedure (once for each variety of sweet)
- Remind the students to touch their chocolate minimally, as the heat from their hands can change the behavior of the chocolate and the results of their experiment.
- Unwrap the chocolate miniature and, holding the short ends between finger and thumb, snap the candy in half.
- Immediately put the candy down so as not to overheat it by touching it.
- Evaluate the fracture and classify as brittle or ductile.
- Repeat procedure with next variety of chocolate.
Teacher Content and Discussion
2nd Grade (2-PS1-1 thru 2-PS1-2, 2-PS1-4 – Structure and Properties of Matter)
Each sweet we are working with in this activity will is considered a composite. Composites, or composition materials, are created from two or more materials with very different physical and chemical properties. A physical property does not change what the object is. A chemical property will actually change the identity of the object. The table below gives examples of each. (Do not need to go too much into chemical properties, since it includes a lot of jargon)
| Physical Property | Chemical Property |
| Color | Reactivity |
| Shape | Toxicity |
| Weight | Flammability |
| Volume | pH |
It is important for engineers to understand how materials behave in real-world situations to use the correct materials in their projects. Engineers particularly need to know how materials fail, or as engineers call it, fracture. Fracture is the separation of a material due to stresses imposed on it. Fractures in engineering materials are usually one of two types: ductile or brittle. Ductile fractures can be shaped or molded while brittle fractures are rigid and crack.


Now you can ask students,
Question: “Which sweets are ductile and which are brittle?”
Answer: Both chocolates are brittle and the airhead is ductile
Now you can also ask students:
Question: “When would you want chocolate or an airhead to be a wire?”
Answer: “Air head because it’s flexible”
Question: “Would you want the windows in your house to be made of chocolate or airheads?”
Answer: “Chocolate because it can handle the force of constant wind and minor changes in temperature”
Question: “Would you want your car to be made out of chocolate or airheads?”
Answer: “Air heads because of the changes in temperature and load that it needs to bare from people/engine/etc.”
The last topic to discuss with students is the effect heating and cooling has on an object. If we heat the chocolate it melts into a puddle. We can cool it in its originally packaging, and it will look as if nothing happened. The same can be said for the airhead. Ask students:
Question: “Will this same effect happen if we heat an egg and then cool it again”
Answer: “It is impossible to heat and then cool an egg to get it to its original form. This is because a chemical reaction occurs when heating the egg in addition to the heat being applied. There is not chemical reaction that occurs in heating the chocolate, so we can easily cool it again to its original shape.”
K-2-ETS1-1 thru K-2-ETS1-3 – Engineering Design
Here you can task students to take their knowledge of ductile and brittle composite to design their very own car. You can pose the design as follows:
You are being hired to specially design the next car of the future, based on your expert knowledge on composites! Here are the steps you must take to design your car.
- Decide what type of material your car will be made out of, and why. Your choices for materials are below:
Material Ductile/Brittle Melting Temp (degrees Fahrenheit) Concrete Brittle 1800 Glass Brittle 2600 Gold Ductile 1950 Silver Ductile 1760 Copper Ductile 1980 Steel Ductile 2500 - Draw your car! Pay special attention to the shape of your car. Consider: Is a tall or shorter car better? Is a small or long car better? How many wheels should it have?
- Name your car! On the back of your paper, mention some of the strengths and weakness of your car. (think about the material your chose and the shape)
5th Grade (5-PS1-1 thru 5-PS1-3 – Structure and Properties of Matter)
Extra Materials (if you decide to do the activity below):
- Concrete (fiber = stone, resin = cementer + water mixture)
- Plywood (fiber = wood, resin = glue)
- Plexiglass (fiber = glass, resin = petroleum)
Now we can go into a little more depth about how fractures occur. Ductile fractures are formed when stress is applied to a material which deforms plastically and significantly before it separates, usually by stretching or tearing. Stress, in science, is any physical force or pressure. Brittle fractures occur in materials that are rigid and crack, rather than deform and stretch. Brittle fractures may look bright and grainy along the place where the material cracked. A brittle fracture could happen suddenly and without warning if the stresses become too great (think a high pitched noise breaking a glass).
Graphic courtesy of https://goo.gl/images/kLHQYv
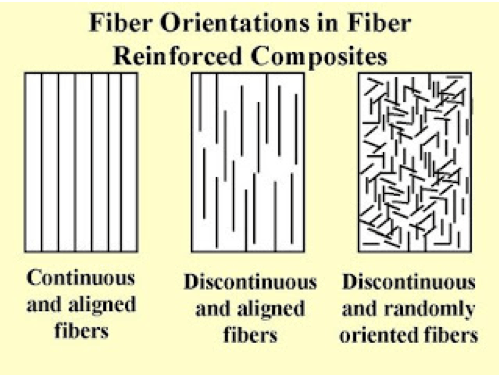
Composites are made up of more than one material, usually a fiber and a resin. A fiber is a thin thread of material and resin is typically a clear thick liquid that solidifies when combined with the fiber. Fibers can be arranged in an orderly or random manner, and can of uniform or varying lengths. Fiber length and orientation can affect not only the strength of the composite, but also the way it fractures.
So how can we consider the sweets used in this activity as composites.
- Milk Chocolate – fiber is the cocoa resin is the milk
- Krackel – same as milk chocolate, and the rice crispy can be thought of as voids (see below)
- Air Heads – the sugar is the fiber and the oil is the resin (however we just see the end product, which has the consistency of taffy)

Graphic courtesy of https://goo.gl/images/FbWBZH
Ask students if they have ever popped air bubbles in chewing gum. These same things can happen to composites – bubbles, or voids, can form in the resin. Voids can weaken the structure of the composite by causing the fiber to separate from the resin, or just by being a weak spot where a fracture could start. Sometimes enough of these bubbles can form at the microscopic level that you cannot even see them forming. Remember how we said brittle material can sometime just “break out of nowhere”. This isn’t magic, rather, the voids are forming at the microscopic level. You can also discuss how rust forms. The metal atoms react with oxygen in the air, and sometimes the oxygen can get into the small voids inside an object. The deeper the oxygen gets, the quicker the object corrodes. Another topic to discuss is the conservation of mass. The conservation of mass states that mass cannot be created or destroyed. To prove this principle, you could run a quick experiment asking students to measure their chocolate before melting and after melting. They should notice that the weight stays the same. Based on what students now know about composites, ask them to fill out the following table for common composites in everyday life. It might be good to hand out an example of each, or have them at the front of the room for viewing purposes. Before doing so, they should know that hardness can loosely be defined as how easily something can be scratched by itself. Hardness for non-woods is measured on the Moh’s Scale from 1-10, with 1 being softest and 10 being hardest. Hardness for woods is measured on the Janka scale. Finally compressive strength is a material’s resistance to break under compression. The higher the strength, and the stronger the material. It is typically measured in Mega-Pascuals (MPa). For some additional background on the material’s compositiosn, concrete (fiber = stone, resin = cementer + water mixture), plywood (fiber = wood, resin = glue), plexiglass (fiber = glass, resin = petroleum).
Give to students
| Composite | Hardness (Moh’s Scale) | Hardness (Janka Scale in lbf) | Compressive Strength |
| 3 | N/A | 17 MPa | |
| N/A | 660 lbf (2,900 N) | 50 MPa | |
| N/A | 1350 lfb (6,000 N) | 48 MPa | |
| 6 | N/A | 140 MPa |
Answer Key
| Composite | Hardness (Moh’s Scale) | Hardness (Janka Scale in lbf) | Compressive Strength |
| Concrete | 3 | N/A | 17 MPa |
| Softwood Plywood (fir) | N/A | 660 lbf (2,900 N) | 50 MPa |
| Hardwood plywood (oak) | N/A | 1350 lfb (6,000 N) | 48 MPa |
| Fiberglass | 6 | N/A | 140 MPa |
3rd, 4th, or 5th Grade (3-5-ETS1-1 thru 3-5-ETS1-3 Engineering Design)
Extra Materials (if you decide to do the activity below):
- Access to a computer with internet
- Pencil and paper
Goal: Designing a composite that would be best to build a water, land, air, space object. Make sure at least each student/group has water, land, air, space
Procedure:
- Students research common fibers and resins.
- They should consider cost of product and properties of fibers/resins best for application. They should also research which materials are currently used for existing boats, cars, planes, spaceships.
- Once their research is complete, ask students to draw their creation
- Students should provide at least 3 reasons for why their design looks the way it does (like the materials used, why is that the best material for water/land/air/space)
- Group students by “water”, “land”, “air”, and “space” and have them present within the group
- That group of students will then use their creations to design a new build that features every group members design.
- Each group will choose a leader to present their collaborate design to the larger class.
Middle School (MS-PS1-1 thru MS-PS1-4 Structure and Properties of Matter)
Three of the major molecules you will find in chocolate are glucose (sugar), caffeine, and theobromine. Their molecular structures are shown below.

To give students a brief overview of the parts of the structures:
- Every line is a chemical bond, or single bond
- Double lines mean a double bond, which are a stronger attraction than just a single bond
- Each letter represents a different chemical element (H=hydrogen, C=carbon, O=oxygen, =nitrogen). There are many more elements that exist in the world, as shown on the periodic table, but only four are used for these molecules.
- Notice that caffeine and theobromine have nearly identical structures, with the exception with what is in the red circle. Because their structures are very similar, students should know that their properties are also similar.
- Finally, each of these structures forms some sort of polygon. In chemistry, we call these aromatic rings.
MS-ETS1-1 thru MS-ETS1-4 Engineering Design
Additional Materials (per student or team of 2-3 students)
- Stirrer hot plate (https://www.amazon.com/s/ref=nb_sb_noss_2?url=search-alias%3Daps&field-keywords=hot+stir+plate&rh=i%3Aaps%2Ck%3Ahot+stir+plate)
- Magnetic stir bar (https://www.amazon.com/magnetic-stirrer-mixer-White-Color/dp/B00IVASAPI/ref=sr_1_4?ie=UTF8&qid=1519666826&sr=8-4&keywords=magnetic+stir+bar&dpID=31GuPrrjf7L&preST=_SX342_QL70_&dpSrc=srch)
- Thermal insulation wrap (https://www.amazon.com/Car-Insulation-Deadener-Automotive-Lightweight/dp/B016QUS1YE/ref=sr_1_1_sspa?ie=UTF8&qid=1519667197&sr=8-1-spons&keywords=thermal+insulation&psc=1)
- Thermometer
- DIY Double Broiler
- Small cooking pots
- Metal Bowl
- 3-4 metal/hard plastic bowls to collect trials of different chocolate
- Rubber spatula
- Access to cold storage (fridge or freezer)
- ½ pound chocolate melting wafers
- Access to water
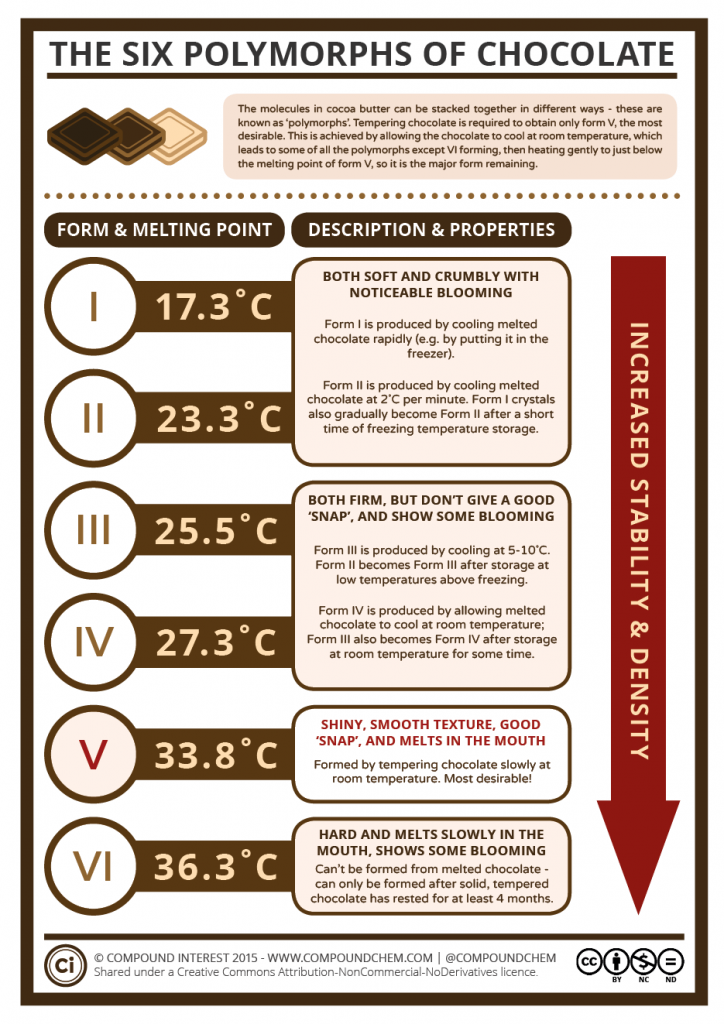 It turns out it is a science in and of itself to get chocolate to the exact taste we like! The temperature you melt the chocolate at will determine its end desirability. Consider handing out the below handout to students which describes the six polymorphs of chocolate. (The link to the picture is: http://www.compoundchem.com/wp-content/uploads/2014/04/Chocolate-Polymorphs-2016-724×1024.png) We have also attached a full size image to the end of this packet. A polymorph is a non-living object or material that can take multiple forms. You might be wondering at this point: how do we know for sure that the chocolate is at that precise temperature when heating?
In the lab, scientists and engineers often use more precise means of measuring temperature as compared to someone cooking on a stove. To prepare something like chocolate at these precise temperatures, we would design a uniform heating and cooling system via a batch reactor and thermocouple. A batch reactor is a type of vessel used to mix a substance without exposure to the atmosphere. A thermocouple is a temperature measuring device that uses electricity and temperature to give more precise temperature readings. Examples of both are shown here.
For our purposes in this engineering design, we are going to design a much simpler batch reactor that will allow uniform heating, cooling, and mixing. At this point you can hand out the necessary materials for this build.
The idea here is to create a device that will give the most accurate reading of the temperature inside the pot, while also turning out the best quality chocolate in the fastest amount of time.
Notice how we are concerned about time and quality here. These are just some of the many things engineers are concerned about. Any time an engineer designs something, they need to pay attention to:
- Time
- Quality
- Money
- Use of Resources (how many material does it take to build)
- Environmental Impact (will it hurt the environment)
- Societal Impact (will people actually benefit from it), and many more!
After the students design their “batch reactor”, they should follow these instructions to temper their chocolate. Tempering is the process of reheating and cooling something to improve its hardness and elasticity (or “bediness”). One student in the group should label each trial to describe the process of how that chocolate was tempered (any changes that were made to the heating and cooling). Students should wait to eat their chocolate until after they have done all their trails.
Procedure to Temper Chocolate
- Break up the chocolate into small pieces.
- Place two-thirds of the chocolate in the metal set over a saucepan of simmering water. Make sure the bottom of the bowl does not touch the water. Place a candy thermometer or digital thermometer in the chocolate and stir frequently with a rubber spatula.
- Do not let the temperature of the chocolate exceed 120°F for dark chocolate or 105°F for milk or white chocolate. When the chocolate has fully melted, remove the bowl from heat. Wipe the bottom of the bowl to get rid of any condensation.
- Stir in the remaining third of the chocolate a little at a time. Let it melt before adding more.
- Let the chocolate cool to about 82°F. If it is warmer, keep stirring and let it cool some more. If it is cooler, begin reheating in the next step.
- Once the chocolate is 82°F, place it back over simmering water. For dark chocolate, reheat to 88°F to 91°F. For milk and white chocolate, reheat to 85°F to 87°F. Remove the bowl from heat once you have reached the right temperature.
- Spread a small spoonful of chocolate on a piece of wax paper. If it looks dull or streaky, re-temper the chocolate, starting with step 2. If it dries quickly with a glossy finish and no streaks, the chocolate is in temper.
Keeping chocolate in temper
- Once melted chocolate has been tempered, it must be used before it cools and sets. If it cools to about 84°F to 86°F and is still fairly liquid, it can be reheated to a liquid consistency. If it has completely cooled and solidified, it should be re-tempered. Heat it for 5 to 10 seconds at a time, stirring and checking the temperature before reheating. For dark chocolate, reheat to 88°F to 91°F. For milk and white chocolate, reheat to 87°F to 88°F. If you keep your chocolate within these temperature ranges, it will stay in temper and be liquid enough to use.
(Above recipe borrowed from https://www.epicurious.com/recipes/food/views/how-to-temper-chocolate-356869)
Give students time to test out a design, make changes, and retest 2-3 times. The process of repeating an experiment is called an iteration. Advise students to only change one thing at a time between experiments. If you have access to a fridge/freezer, tell students to put their heated chocolate immediately in the fridge/freezer after heating for one of their trials to see how that affects the taste.
Students can now test their trials, and write down observations about the taste and smell of each trial. Have groups compare the results with each other!
