Choosing A Weather Station

Setup-4

(Picture of a Sparkfun weather station)


For this project, we wanted to be able to post data online to engage the community and participate in citizen science initiatives, along with being as low maintenance as possible.


Ideally the smart roof deck garden will be able to decide whether or not to water itself based on current and upcoming weather. If you take a look at our first post on sensors, you see other reasons why we want hyper local data about the garden. We also want to participate in citizen science initiatives, and be able to check the conditions in the garden remotely.  In order to do these things, we needed to find a home weather station that could help us track the weather in addition things like soil moisture and temperature that are capabilities we were already working on. For our purposes, we wanted a station that could track air temperature, wind, barometric pressure, light, and humidity.


We researched several types of weather stations and read blog posts about the pros and cons identified by other users. A New York Times article suggested a few websites that carry the most popular systems.  We found the article to be very helpful and we visited the websites that were suggested. At first, it seemed that Acurite Systems were the most popular and practical. Several other websites we visited advertised Acurite weather stations. However, with further research, we discovered that although they are high quality, they would not work for us because they failed to measure barometric pressure. Many of the other systems we looked at, like Oregon Scientific and La Crosse Technology stations, measure wind, temperature and humidity but we had to look more carefully for measurements of barometric pressure. We finally came across a home weather station that covered all of our necessities from Ambient Weather. It measures wind, temperature, humidity, barometric pressure and even rainfall. This system goes beyond what we wanted because it is able to export data to Wunderground which can help us track and record the data.


After a bit more digging, we happened upon a tutorial from one of our favorite sites, Sparkfun, on creating a home weather station that connects to Wunderground. We dutifully ordered the parts and started setting up our own version.


Analysis of the Weight of the Smart Roof Deck Garden

mms_img-242010034

A garden can weigh more than you might think due primarily to the amount of soil being used and the soil’s ability to retain water.  Most roof structures are only designed for snow and rain loads, not to support the additional loads from planters, wet soil, and people using the garden. Because the roof we worked on is relatively old it can probably only hold 30 lb/ ft², which is why the deck sits on the masonry bearing walls.  In this case, the capacity of the roof itself is irrelevant, and we need to focus on the capacity of the deck.  With help from our civil engineering friend Kartik Patel and our own online research we found that a standard deck built with 2 x 8 ft joists spaced at 16 inches on center should be able to comfortably hold 50-60 lb/ ft² of live load in addition to its own weight (60 lb/ ft² is the minimum live load required for a deck as defined by the American Society of Civil Engineers (ASCE)). Below we summarize how we calculated the weight of the garden and how we checked that the deck would be able to support the weight.

The basic formula for the weight of the garden is  soil mixture + lumber = total weight

Note that we neglect the weight of the plants and the irrigation system since they are relatively small.

Soil Mixture

Our soil mixture of 1/3 vermiculite, 1/3 peat moss, and 1/3 compost proved to be relatively light compared to other soil mixtures we experimented with that included top soil.  This is the soil combination called “Mel’s Mix” in his book Square Foot Gardening.  However, ready-made Mel’s Mix was not available at our local Home Depot so we bought bags of vermiculite, peat moss, and compost separately for the bottom half of our garden.

Because our garden consists of nine 3 x 3 ft planters, it will cover 81 ft²:

Capture

We know how many cubic feet of soil we need using a soil depth of 6 inches:

Capture1

Now combining the weights of each soil type based on the proportion they were used in and the weight of the lumber, we can approximate the weight of the garden.

Soils Dry Density (lb/ft³) In Bag (ft³) Weight in Bag (lb)

Coverage Depth (ft)

Coverage Area (ft²) Out of Bag (ft³)
Peat Moss 6.7 3 40 0.17 36 6
Vermiculite 7 NA NA NA NA NA
Compost 51.9 NA NA NA NA NA

Table 1.  The above table lists the weight per ft³ for the three types of soil we used.  We had a bag of compressed peat moss (meaning when it is taken out of the bag it expands).  On the bag it told us how many ft³ it covers in and out of the package, how much area it takes up, and that it expands to double the size. If you multiply peat moss’ coverage depth and coverage area you get the expanded, out of bag volume of soil which is double the volume in the bag.  Dividing the weight by the out of bag volume then gives the dry weight density of peat moss.  We estimated the density of vermiculite off of a website.  Compost varies in density because its components can vary depending on where you buy it from, so we estimated its dry density based on information we found online.

Combining the densities for each soil and multiplying against the volume of the soil we get


Capture2

for the weight of the bottom half of the soil mixture in the garden.

For the rest of our soil we ended up finding a local Philadelphia seller that had a similar soil mix to Mel’s that replaced vermiculite with rice hulls and added worm castings. We weighed several cups of the new mixture and came up with an average density of 3 oz/cup. This translates into a weight of 908.88 lb if we were to use this soil mixture for the entire garden.

Capture3

The total soil weight between both mixtures used is therefore

Capture4

Lumber

We created a prototype planter (see this link for build instructions and details) and weighed it at 35 lb. With 9 planters, this is a total lumber weight of 315 lb.

Moisture

Moisture and water weight is considered a live load meaning it is not an intrinsic weight of a structure.  When the soil is saturated the garden will weigh more.   We found that standard wet soil is 100-120 lb/ft³.  For a 6 inch coverage we should use 50-60 lb/ft².  With the area of our soil coverage in the garden calculated above, this brings our wet weight of the soil mixture to 81 ft² * 60 lb/ft² = 4860 lb, which is significantly higher than the dry weight.  This is a very conservative estimate because our soil mixture is quite a bit less dense than standard soil, but it gives an upper limit to the saturated soil mixture weight.

The pine used to create the planters retains water as well, so we let a prototype planter sit outside for a month with soil in it, then emptied it and weighed it at 43 lb – about 8 lb more than its dry weight. This changes the lumber weight from 315 lb to 387 lb total.

Weight Analysis

The dry weight of the soil mixture and lumber is

896.7 lb + 315 lb = 1211.7 lb

which is equivalent to 15 lb/ft².

After moisture and water weight are taken into account, the total weight of the garden is approximately

4860 lb + 387 lb = 5247 lb

which is equivalent to 65 lb/ft².  Although this exceeds the 60 lb/ft² live load the deck is likely designed to handle, this also uses a very conservative estimate for the weight of the wet soil mixture.  Following this analysis, we again consulted Jennifer Pazdon, a licensed structural engineer, if she thought the deck could hold the additional weight from the garden based on our analysis and she said it would be okay.  Based on these calculations and her feedback we moved forward with the installing the garden.

Building Codes and Permits

Before putting several hundred pounds of planters, soil, and plants on a roof deck, you will want to check that you can do so safely and learn about any regulations that might come into play if you consider making things like shade structures, benches, or other permanent structures on your roof deck.  A good place to start is to make sure your roof deck was built to code in the first place.*  Some building owners might be able to confirm this easily through paperwork on a recently built deck while others with older decks might need to do a bit more digging.

Building Codes

A good place to start is the International Residential Code (IRC) that governs all residential construction.  Some states and cities also have their own codes that may be adapted from the IRC, or introduce additions or modifications. This creates safety standards for any project that you must follow when working on a rooftop. You can purchase the 2015 IRC at the link above but it is pretty pricy. Instead, if you use the 2012 IRC, you should be able to find most of the information you need.

Since the pilot installation site for our project is in Philadelphia, Pennsylvania, we looked at the applicable codes section of the licensing and inspections website, which includes the Uniform Construction Code for Pennsylvania state and the Philadelphia Building Construction and Occupancy Code for the city of Philadelphia.  You can use these codes to double check regulations for things like guards (railings), stairs, and other features of your deck to make sure it is built to code.

Permits

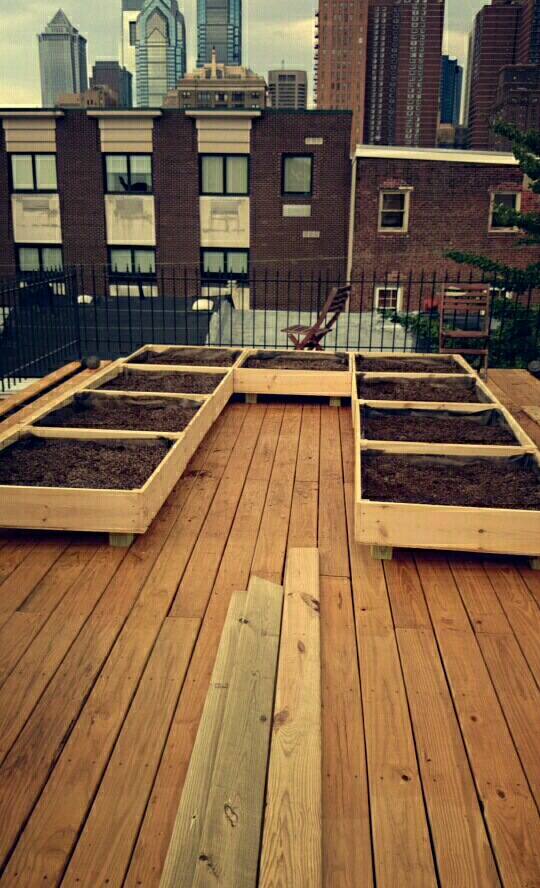
If you need to make any changes to your deck before installing planters, you’ll also want to check if you need a permit to do so.  At our pilot site, we found that the old pressure treated lumber used for the decking was pretty soft and rotted, and we were not confident it would support the weight of the planters.  Thus we knew we would need to lay new decking.  We also wanted to change the stairs to make the roof deck easier to access, and change the railings on the upper and lower deck so they were taller and more stable.  Luckily, Philadelphia has a great permit guide with relevant information to our project.  You can see which headings throughout the permit guide I reviewed below.  After some research, we were pretty sure that we could proceed with replacing the deck boards and modifying the railings, but any work on the stairs would require a permit.

To confirm our research, we also called the department of licenses and inspections.  It turned out that we were right: replacing deck boards and railings did not require a permit, but building new stairs would.  Due to the cost of removing the old stairs, we decided to move forward with just replacing the decking on both decks and replacing the railing on the small deck.

Notes on Philadelphia Permit Guide

Filing for Permit: One- and two-family dwellings ⇒ $25 filing fee for a permit.

See Philadelphia Permit Guide for more information. Go to A-6 and read on to where it directs you to B subsections.

The following sections seemed worthy of review: A-4    A-5    A-6    A-7    A-9    A-13    A-22

Applicable:  A-6 and possibly A-13

A-6 ⇒ Repairs and Alterations to an Existing Structure – Applicable for altering, modifying, repairing, or improving a structure.

*Exemption for shade cloth structures constructed for agricultural purposes that do not include service systems.

*Failed exemption for stairway.  Replacement of exterior stairs, ramps, platform lifts, steps and landings accessory to a one- and two-family dwelling provided that they do not exceed 6 feet in vertical height; do not encroach upon the public right-of-way; and the landing does not have a surface area greater than 36 square feet with no individual dimension greater than 6 feet. This exclusion does not provide for vertical enclosure of the covered element(s) except guards required by the Building Code.

A-13 ⇒ Zoning Permit – Possibly applicable, not changing lot lines.

Not Applicable: A-4,  A-5, A-7,  A-9, and  A-22

A-4 ⇒ Mechanical Work – Not applicable, project does not pertain to heating, ventilation, air conditioning, fuel gas piping or refrigeration.

A-5 ⇒ New Construction – Not applicable, project is not creating a completely new structure. Exemption includes water tanks of less than 5,000 gallons and height to diameter or width ratio of 2 to 1 or less

A-7 ⇒ Building Permit: No Plans – Not applicable, not applying roofing cover coating.

A-9 ⇒ Electrical Permit – Not applicable, not Installation, alteration, replacement and repair of electrical, fire alarm and communication wiring and equipment within or on any structure.

A-22 ⇒ Stormwater Runoff Permit – Not applicable because we are not changing main flow of runoff.  We are not creating new runoff.

*Thanks to structural engineer Jennifer Pazdon for guidance on this section

Overview Of Internet Of Things Platforms

Although green roof gardens help moderate inside temperature, manage stormwater runoff, improve air quality, and have many other benefits, we wanted our green roof garden to go farther. We want our smart green roof deck to be online and join the internet of things (IoT).  This serves two purposes:

  1. If garden data is available online, we can use it to help automate the garden and reduce maintenance like watering, monitoring, etc. since a building owner could check on the system from anywhere
  2. By making the data publicly available, we could engage local communities


Let’s focus on number two for a minute.  An organization call the greenSTEM network is doing something similar – you can see and download raw data from their garden sensors at several different sites. This would enable teachers to teach things like excel and graphing with real numbers that can be used to visualize real data and change, instead of random numbers from textbooks that the students don’t connect to. Using electronics we want our rooftop garden to be able to send data, like temperature, precipitation, wind, and moisture directly to a website. Hopefully teachers will be able to access the data and use it to engage their students using real life examples.


The greenSTEM network gets data online through a relatively complicated chain: A Jeenode connects to the sensors and sends data over radio frequency to a raspberry pi, which sends data over wifi to the cloud in a server they created for the purpose.  We’re looking into other ways of posting the data that skip the middle step and use a readily available IoT application platform. A few options we’ve come across include:


If you have any favorites we didn’t list here, or other suggestions, please let us know in the comments!


Garden Sensors: Take 1

In order to make the roof deck garden “smart”, we need to incorporate sensors for several reasons.

  1. To automate watering with the irrigation system, we need to be able to sense soil moisture
  2. To understand if we can use zone-related outdoor planting information like when to expect the first and last frost, we need to know soil temperature and air temperature.  This will help us understand if the soil temperature drops earlier than it would on the ground.
  3. To learn more about the garden itself and help plan for future years, we want to sense hyper-local weather and collect data such as outside temperature, humidity, wind speed, sunlight, and barometric pressure.  Some of this data might also be possible to get if we have a weather station very close that provides data we can use.

We know that we want to have our garden control itself using certain data, as well as have a cool factor.  For example – if the soil moisture sensor says the soil is dry, but we know it’s going to rain later that day, the system should not enable the drip irrigation.  This type of data can’t be sensed directly, but needs to be downloaded from a weather service.  For example, this blog post shows how to use data from weather underground.

Since soil moisture is the most directly necessary to the function of our garden, we decided to focus on that first.  So far, we have experimented with the Soil Temperature/Moisture Sensor SHT10 from Adafruit. On the Adafruit website, there is information on how to connect the sensor in the circuit, as well as example code to make it work.  For prototyping, we just used electrical tape to secure jumper wires to each of the four colored wires in the sensor cable.

The next step is to decide what data to collect ourselves and what data to gather from online weather sources.  To make the most out of this project, we think we’ll try a combination of both so that we can learn how to integrate data from different sources and compare our hyper-local data with that from a weather service.