Hay Cost Calculator

Hay season is around the corner and many producers are likely greasing the wheels, sharpening blades, checking belt tension, and settling in for a long hay season. However, it may be wise to do some calculating and revisit some management decisions to determine hay needs and to see if there is a way to reduce hay needs. This could be important considering the tremendous cost of feeding cattle 365 days per year and knowing hay tends to be one of the most expensive feeds available.

In order to achieve the task of determining how much hay is needed and what the potential cost will be, Mr. Kevin Ferguson, Ms. Rebekah Norman, and Ms. Tammy McKinley developed an Excel based “Hay Calculator” to help with the calculations. That file can be found at https://ag.tennessee.edu/arec/Pages/decisionaidtools.aspx. The tool takes into account storage losses, feeding losses, bale size and weight, cattle weight, consumption, number of days fed, and hay price to determine hay needs and total cost. The calculator can also assist with hay quality analysis.

Based on several pieces of research, the method of storing and feeding hay significantly increase costs. Average storage losses for hay stored six months or longer range from 5 percent for hay in a barn to 30 percent for hay stored outside and uncovered. Hay stacked and covered with a tarp on a rock pad or pallets results in 12 and 14 percent loss respectively. Additional storage methods include a plastic sleeve and net wrap which result in average losses of 19 and 23 percent respectively.

Similar to storage, the method of feeding hay can influence hay loss. Feeding losses from feeding hay in a cone ring range from 2 to 5 percent while feeding hay in a conventional ring results in 4 to 7 percent hay loss. The use of a hay trailer generally results in 10 to 13 percent hay feeding losses while the use of a cradle will result in 15 to 20 percent losses. Unrolling hay on the ground has the most variability with losses ranging from 5 percent to 45 percent. Hay feeding losses are likely more a function of how much hay is fed at a time as opposed to the method. For instance, feeding a week’s worth of hay in a cone ring will result in more feeding loss than feeding one day of hay in a cone ring.

For illustration purposes, consider a producer with 30 cows averaging 1,200 pounds and feeding 2.5 percent of the cows body weight for 150 days. This would result in each cow needing 30 pounds of hay each day on a dry matter basis. Assuming 11 percent moisture would result in the herd needing 76 tons of hay or 152, 1,000 pound bales. If the bales cost $35 per bale then the total cost to the herd would be $5,320. However, storage and feeding loss have not been considered.

Now consider two management options with this herd: storing hay in a barn and feeding in a cone ring or storing net wrapped hay outside and feeding in a conventional ring. The first system of storing hay in a barn and feeding in a cone ring results in a total loss of 6.4 tons of hay or 13 bales of hay for an additional hay cost of $451 for the herd. The second system of storing net wrapped hay outside and feeding in a conventional hay ring results in a total loss of 21.6 tons of hay resulting in the need of 43 additional bales of hay and adding $1,513 to herd hay cost.

This basic illustration demonstrates changes in feed costs from differing hay storage and feeding management. Producers should consider methods of reducing hay storage and feeding losses to reduce total costs. Producers should also consider grazing management practices that reduce hay needs which have a potential of reducing feed costs.

Planning for the Alfalfa Growing Season

Planning for the growing season this year has been a little different than in previous years. The winter season seemed to be longer than usual and has producers wondering when they would be able to access their fields. Here is a bit of information for those producers that are considering planting alfalfa this year.

Field Selection

Establishment of alfalfa seed require a well-drained soil for optimum production. A germination soil temperature of 45oF is adequate for alfalfa establishment. Achieving a profitable stand of alfalfa is the result of proper field selection utilizing proven production practices to ensure germination and establishment. Poor soil drainage can cause problems with soil crusting which may cause poor soil aeration, micronutrient toxicity, and ice damage during winter.

Soil Fertility

It is important to remember to ALWAYS take soil samples before planting to determine pH and nutrient status of the field. Overall, there are 18 nutrients (macronutrients and micronutrients) essential for alfalfa growth. Some of these nutrients include:

  • Phosphorus: Helps root growth and increase seeding success. Low fertility soils can be improved with an application of 30-50 lbs per acre of P2O5, depending on soil test results.
  • Potassium: Research suggests that potassium has little effect or influence on improving stand establishment, however, adequate potassium should be added to meet the needs of alfalfa and even a companion crop.

Planting Alfalfa

Failure to successfully establish alfalfa can be expensive and may lead to issues related to production soil erosion. Some considerations for planting alfalfa include: (1) seedbed preparation; (2) seeding dates; (3) seeding depth and rate; (4) whether or not to seed with a companion crop; (5) 100% alfalfa seedings vs. alfalfa-grass mixtures.

  1. Seedbed preparation 
    Having a firm seedbed is a critical step to ensure good germination of alfalfa seed. Firm seedbeds will reduce the possibility of planting too deep and will help hold moisture closer to the surface. Packing the soil will help to insure a firm seedbed and good soil moisture retention.
  2. Seeding dates
    Determining when to plant alfalfa depends on several factors such as soil moisture and cropping practices. For best results in South Dakota alfalfa should be seeded between mid-April to mid-May. This all depends on weather conditions as well. This year might be safe to say that seeding alfalfa in mid-May might be the best option for producers.
  3. Seeding depth and rate 
    Seed should be covered with enough soil to provide moist conditions for germination. Seed placement of ¼ to ½ inch deep is appropriate on most soils at rates from 10 to 25 lb seed/acre.
  4. Seeding with or without a companion crop 
    Seeding alfalfa with a companion crop such as annual ryegrass, oats, spring barley, or spring triticale can help to minimize weed competition during establishment. However, planting alfalfa without a companion crop allows producers to harvest more alfalfa with higher quality in the seeding year.
  5. 100% alfalfa seedings vs. alfalfa-grass mixtures 
    Pure stands of alfalfa will produce the highest quality forage and for that reason has the highest demand from the dairy industry. Other producers whose animals’ nutrient requirements are lower may be interested in using alfalfa/grass blends to take advantage of improved persistency while still meeting the nutrient requirements of their livestock. Alfalfa-grass mixtures also offers some advantages such as reduced weed pressure and soil erosion.

The Bottom Line

It is always handy to remember that the first harvest seeding year is when alfalfa is seeded in the spring and considerations of taking one or two cuttings in the same year need to be made by then. The first harvest should be done after the flowers begin to appear, allowing greater energy reserves in the roots. Generally, alfalfa will reach this stage of development 60 to 70 days after emergence. Harvesting delays during this stage will cause large reductions in quality and a decline in total yield over the season because fewer harvests are possible.

I hope this growing season is another successful one. We might be a little slow this year; but that does not mean we won’t be able to achieve the goals for production.

Time to Check for Winterkill Injury

Winterkill Injury

There is a wide range of winterhardiness among alfalfa varieties. Some varieties may have suffered winterkill injury this winter, especially where the crop had no snow cover. Like in wheat, winterkill in alfalfa occurs when the crown is frozen. When this occurs, the taproot will turn soft and mushy. In the early spring, check for bud and new shoot vigor. Healthy crowns are large, symmetrical and have many shoots. Examine them for delayed green-up, lopsided crowns and uneven shoot growth. If any of these characteristics are present, check the taproots for firmness. Some plants may even begin to green-up and then die. Plants putting out second leaves are likely unaffected.

Interseeding alfalfa to thicken an alfalfa stand will generally not work. If the stand is one year old or less, plants will generally come up and then be outcompeted by the survivors from last year. Large dead spots should be disked first and then seeded. If the stand is two or more years old, interseeding alfalfa will not work because of autotoxicity.

Heaving Effect

As the soil freezes and thaws, alfalfa stands can be damaged by the heaving effect. This will be more likely to occur where soils are not under continuous snow or ice cover and where temperatures have been in the single digits at night. This winter has been cold enough to freeze the soil where it is not under snow cover. Soils with high levels of clay are especially prone to winter heaving.

If heaving has occurred, dig up some plants to determine if the taproot is broken. Plants with broken taproots may green-up, but they perform poorly and eventually die. Slightly heaved plants can survive, but their longevity and productivity will be reduced. Crowns that heaved 1″ or less are not as likely to have a broken taproot. With time, these plants can reposition themselves. Raised crowns are susceptible to weather and mechanical damage. Raise cutterbars to avoid damaging exposed crowns.

Evaluating Plants and Stands

Producers should start to evaluate the health of their alfalfa stands as soon as the soil thaws.

  • Look at the crowns and roots.
  • Buds should be firm, and white or pink in color if they have survived with good vigor.
  • The bark of roots should not peel away easily when scratched with a thumbnail.
  • When cut, the interior of healthy roots will be white or cream in color.

When alfalfa growth reaches 4 to 6″, producers can use stems per square foot to assess density measure. A density of 55 stems per sq. ft. has good yield potential. There will probably be some yield loss with stem counts between 40 and 50 per sq. ft. Consider replacing the stand if there are less than 40 stems per sq. ft., and the crown and root health are poor.

If an established stand was injured by winterkill or heaving, and large patches are dead, producers may want to buy some time before replacing the stand by temporarily thickening the bare areas with red clover. Red clover is not as susceptible as alfalfa to the plant toxins released by alfalfa (allelopathy) and helps provide good quality forage.


Test Hay, Don’t Guess

November 25, 2017 01:19 PM

Fall is here and the weather reminds us of the changing of the seasons. This is the time of year when many producers are hauling hay home for the winter as well as pricing and purchasing hay. There is a tremendous range in hay quality depending upon level of maturity, fertilization, growing conditions, harvest circumstances and storage methods. Accurately sampling and testing hay is the only way to get a real understanding of the nutritive value of feed. Using values from previous years or a “book value” can be costly since a producer may incorrectly develop a ration using values that aren’t representative.

Guidelines for sampling

When sampling hay, getting a representative sample is a critical first step. Samples must accurately represent the entire lot of hay. When obtaining a sample for analysis, it should be kept separate from other lots of hay. The UNL NebGuide “Sampling Feeds for Analyses” (PDF version, 655KB) states that a “lot” of hay should be harvested from the same field consisting of similar types of plants, cutting dates, maturity, variety, weed contamination, type of harvest equipment, curing methods and storage conditions. When these conditions differ, feed should be designated and sampled as a separate “lot”.

Hay samples should be taken using a hay probe or a core sampler. The hay probe should penetrate at least 12-18 inches into the bale and have an internal diameter of at least 3/8 of an inch. Using your hand to grab a sample will not consistently provide reliable results. Tips of hay probes should be kept sharp to cut through hay and prevent selective sampling. Avoid getting hay probes hot when using a drill to drive the probe into the bale, since friction from high speeds can heat the probe to a point where it damages the hay sample.

To get a representative hay sample from a “lot” of hay, select 15-20 bales in the lot. Knowing the total number of bales that are present can help identify a random method that should be used (such as sample every fourth bale) to obtain an accurate sample. Once all of the samples for a “lot” have been collected, the samples may need to be sub-sampled to get the feed down to a sample size that can be sent in for analysis. The UNL NebGuide “Sampling Feeds for Analyses” walks through a step-by-step process to do this. Being careful to ensure the sub-sample submitted is representative is important.

Once hay samples have been taken store in a plastic sealed bag in cool dry place until the sample is ready to be submitted. Samples that contain over 15% moisture should be frozen. Make sure to label the bag with your name, address, lot identification and feed type. Most commercial labs provide an information submittal form that allows producers to select a standard feed test for forages. Whenever possible, send samples into the lab early in the week to avoid having the samples sit over a weekend.

Analyze for moisture, protein and energy

Cattle feeds should be analyzed for moisture, protein and energy. Producers may also want to have forages tested for key minerals. Feed sample results are usually reported on an as-is and dry-matter basis.

When developing a ration for cattle or comparing feeds to one another, always utilize the nutrient analysis on a dry-matter basis. After formulating a ration on a dry-matter basis, the values can then be converted to an as-is basis using the moisture content of the feed to determine the actual amount of feed that should be fed to the cattle on an as-is basis.

Analyze forages for nitrates

In addition to moisture, protein and energy, annual forages harvested for hay such as foxtail millet, oats, sudan grass and sorghum-sudan hybrids should be analyzed for nitrates. These annual forages can accumulate high levels of nitrates under various growing conditions that can potentially reach toxic levels. The only way to know if high levels of nitrate accumulation have occurred is to test for it. See the UNL NebGuide “Nitrates in Livestock Feeding” (PDF version, 319KB) for additional information. For additional information on understanding the results from a hay analyses, please see the “Understanding a Feed Analysis” Learning Module on the UNL Beef website.

Conclusion

Accurately testing hay takes time and money. However, the value of this information is critical in accurately and cost-effectively formulating rations. Don’t let the small investment of time and money discourage you, it may be some of the best time and money you can invest in your operation.

Bargain Hay is No Bargain if it is Poor Quality

Bargain, poor quality hay may actually be more expensive when you factor in waste, lower intake, and nutrient deficiencies that require higher supplementation.

Everyone likes a good bargain, but when it comes to hay, low price often equates to poorer quality. Because hay is often sold by the bale, the amount of savings from the “good bargain” can be reduced substantially if there is a negative impact on herd nutrition. So what constitutes “poor quality hay?”  It is hay that limits how much a cow will eat, has a low energy value, low protein content, and as a result requires a large amount of supplemental feed to support cow performance. Poor quality hay generally results from inadequately fertilized fields and/or harvesting more mature plants to increase yield per acre. This combination of sub-optimal forage management leads to increased plant fiber content, lower digestibility and ultimately lower nutritional value.

How increased fiber impacts hay quality:

Intake is reduced as fiber content increases. Mature or “rank” hay reduces the total amount cows willingly consume each day.   It hurts both their appetite and the amount their rumen can physically hold.  Likewise, the increased fiber content decreases the digestibility of the hay, which also contributes to the gut fill limitation imposed by poor quality hay. Cow intake requirements change throughout the production cycle, but increased intake requirements do not equate to greater intake when the quality is poor.  Just because she needs more nutrients does not mean she will eat more.

Energy limitations result from increased fiber content which decreases the digestibility of the hay. The more mature the hay the less energy that is available from each mouthful. Coupling limited energy availability and reduced intake negatively impacts cow performance. Compounding the nutritional issue is that prior to calving and during lactation cow energy requirements increase and reach their peak. Therefore, poor quality hay reduces cow performance expressed as milk production and reproduction.

Higher fiber content also limits the digestibility and availability of the protein in the hay. Hay quality compromised by low fertility, causes protein content of the forage to be reduced.  Low protein diets from poor quality hay also limits intake of forage because of the deficient nitrogen and protein supply for the rumen microbes, which are actually digesting the forage. Limitations on the protein concentration ultimately limits cow productivity.

Impacts of Poor Quality Hay on Body Condition:

So let’s consider all the characteristics that are limiting in poor quality hay. The hay that limits cow hay intake and nutrient intake lead to the cow mobilizing body tissue to meet nutrient deficiencies.  There is a limited amount of body fat and muscle that a cow can mobilize to support her production.  Mobilization of body fat and muscle over time leads to decreased cow body condition score (BCS). Decreased cow body condition score below the pivotal BCS of 5 leads to decreased cow productivity and decreased cow reproductive performance.

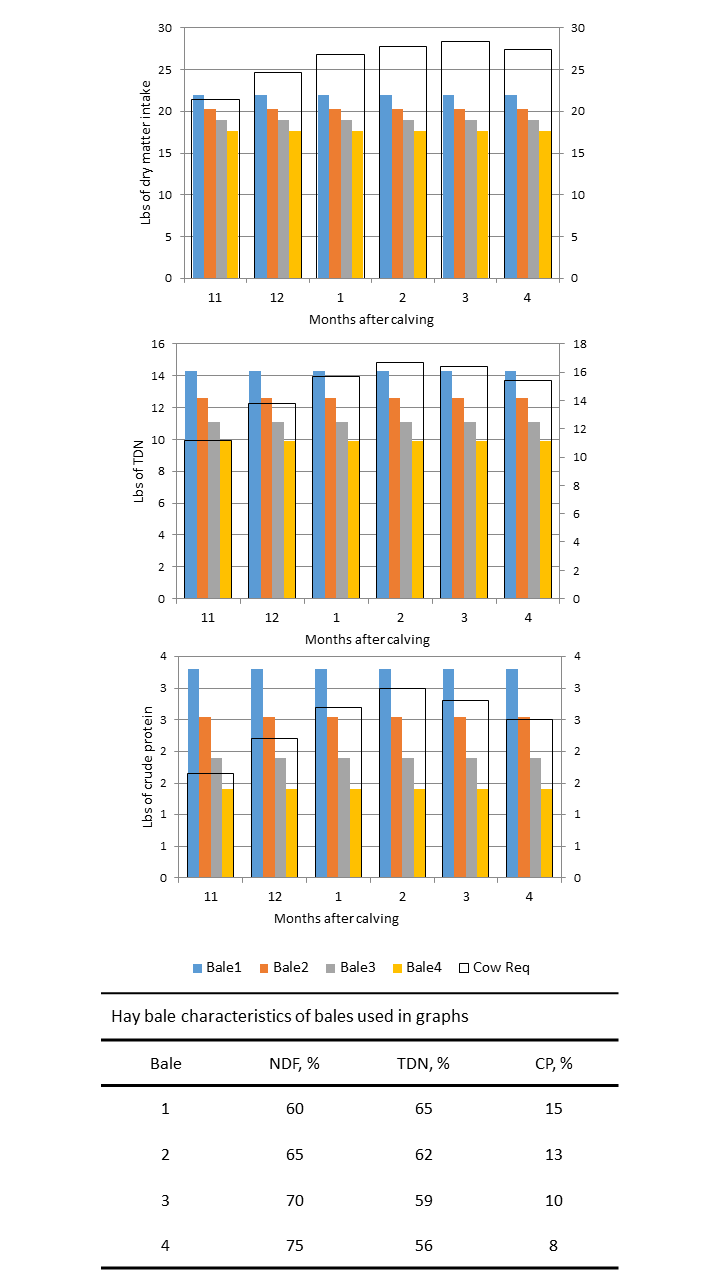
The figures below demonstrate the effect of different hay qualities on estimated cow dry matter intake potential, TDN/energy intake, and crude protein intake relative to what a 1200 lb, average milk potential cow requires during the critical months leading up to calving and after calving. As you can see, hays frequently produced and purchased in the Southeast are quite limiting for cow intake, energy supply, and protein supply.

Bale 1 does an adequate job of maintaining a cow, bale 2 a fair job, but bale 3 and 4 leave much to be desired. The limited intake and energy supply in the hays result in body condition score loss from 5 to 4 by the cows in as few as 25 days for Bale 4 one month before calving, to as long as 217 days after calving for Bale 1 . The conclusion here is that bad hay results in rapid cow body condition score loss at critical times in the production cycle.

Summary:

The direct cost of bargain hay is only known if you have results of a forage test, know the true quality of the hay is, and decide to fix the problem by purchasing supplements to fill the nutrient deficiencies. Supplemental feeds can improve intake limitations and fill any energy and protein deficiencies. The cost to fix the hay is determined by how large the intake, energy, and protein deficiencies are that need to be fixed, and the cost of the supplements considered. The indirect cost of bargain hay results in decreased cow performance that is manifest as decreased pregnancy rate and weaning weights of calves.

Limitations on hay intake and the deficiencies in energy and protein from the hay lead to increased costs associated with hay feeding. Coupling the cost of the hay, hay waste as result of poor quality hay, and additional supplementation cost all adds up, and eat into enterprise profitability. Bargain hay ultimately costs you twice, first when you purchase the hay and next when you feed it.

To have your hay tested for quality, contact your local Extension agent.  For more information related to this subject, use the following links:

Year’s use of a NH Baler

New Holland is offering a a chance to win a one-year use on a Roll-Belt TM 450 Silage Special Round Baler.  Growers are invited to submit a picture of their first cut at www.NHFirstCut.com .  The photos will be voted on by the public for the first round and another round of voting by New Holland Executives.  The competition ends July 31.  001

Delaware Ag Week Programs for Livestock Producers

Mark your calendars for the 10th Annual Delaware Agriculture Week, January 12-16, 2015.  This is an excellent educational opportunity for Delaware agriculture stakeholders to learn best practices and new technologies, meet vendors and network with other agricultural producers.  This year’s event will once again be located at the Delaware State Fairgrounds in Harrington.  Delaware Agriculture Week provides numerous sessions that cover a wide array of topics including small fruits, fresh market & processing vegetables, small flock & commercial poultry, grain marketing, grain crops, hay & pasture, beef cattle, irrigation, direct marketing, and much more.  Nutrient management, pesticide, and certified crop adviser continuing education credits will be offered.

Delaware Ag Week is sponsored by the University of Delaware Cooperative Extension, Delaware State University Cooperative Extension and the Delaware Department of Agriculture.

Sessions of particular interest to livestock producers are January 12 and 13, 2015 and include the Beef Cattle Producers Session, the Delmarva Hay and Pasture Conference and the Small Ruminant Session.  The program schedule’s are as follows:

Delaware Ag Week Seminar for Beef Cattle Producers, Monday, January 12, 2015- 6:00-9:00 pm

Exhibit Hall Board Room

6:00 p.m. – 7:00 p.m.– Selecting and Caring for a Herd Bull- Dr. Dee Whittier, Bovine Specialist and Extension Veterinarian Cattle, Virginia-Maryland Regional College of Veterinary Medicine

Break for Light Dinner Sponsored by the Delaware Beef Advisory Board

7:20 p.m. -7:35 p.m. – Delaware Beef Advisory Board Updates

7:35 p.m. -8:35 p.m. Using Available Tools to Take Advantage of the Good Times in the Beef Industry- Dr. Dee Whittier, Bovine Specialist and Extension Veterinarian Cattle, Virginia-Maryland Regional College of Veterinary Medicine

8:45 p.m. – Questions, Evaluations and Adjourn

Please RSVP to Susan Garey by January 9th truehart@udel.edu or (302)730-4000 if you plan on attending so we can make the necessary arrangements for food and materials.

DE/MD NM Credits: 0 CCA Credits:  PD: 2

Delmarva Hay & Pasture Conference, Tuesday, January 13, 2015 9:00 am-3:30 pm

Commodities Building

 9:00 a.m. – 9:15 a.m. “Welcome, Housekeeping Details and Evaluations” Dr. Richard Taylor, Extension Agronomy Specialist, University of Delaware

9:15 a.m. -10:15 a.m.Managing Forage Quality with Fluctuating Weather” Dr. Sid Bosworth, Extension Agronomist, University of Vermont, Burlington, VT

10:15- a.m. – 11:00 a.m. “Improving Hay and Pasture Quality Through New Developments in AlfalfaDick Kaufman, Regional Manager, W-L Research, Columbia, PA

11:00-a.m- 11:30 am. “Weather Patterns that Influence Hay Making” Kevin Brinson, Associate State Climatologist and Director Delaware Environmental Observing System (DEOS), University of Delaware

DE Pesticide Certification Credits: 0 MD Pesticide Credits 1 DE NM Credits 1.25 MD NM Credits 1 CCA Credits: 2

 11:30 a.m.           LUNCH IN DOVER Building

1:00 p.m.-1:15 p.m.Greetings From the National Maryland-Delaware Forage Council” Dr. Les Vough, President, Maryland-Delaware Forage Council

1:15 p.m.-2:00 p.m. “Improving Farm Viability Through Advanced Forage Crop Selection and Management” Dr. Sid Bosworth, Extension Agronomist, University of Vermont, Burlington, VT

2:00 p.m. – 2:45 p.m. “When and How to Fertilize Your Pastures to Maintain Stands and Increase Productivity” Dr. Les Vough, Forage Agronomist, Southern Maryland, Resource Conservation and Development, Inc.

2:45 p.m. – 3:30 p.m. “Nutrient Needs and Common Deficiencies of Forage Crops” Dr. Richard Taylor, Extension Agronomy Specialist, University of Delaware

DE/MD Pesticide Certification Credits: 0 DE NM Credits 2.25 MD NM Credits: 2 CCA Credits: NM: 1.5 CM: 0.5

Delaware Ag Week Seminar for Small Ruminant Producers, Tuesday, January 13, 2015- 6:00-9:00 pm

Exhibit Hall Board Room

6:00 p.m. – 6:50 p.m. An Annual Management Calendar for Sheep and Goats- Susan Garey, Extension Agent Animal Science and Dan Severson, New Castle County Extension Agricultural Agent, University of Delaware

Break for Light Dinner

7:05 p.m.-7:30 p.m. Using Anthelmintics Effectively in Small Ruminants- Dan Severson, New Castle County Extension Agricultural Agent, University of Delaware

7:30 p.m. -8:45 p.m. – Value Added Sheep and Goat Producer Panel– hear from producers who have had success with value added sheep and goats products such as cheese, skin care products and meat.

Jackie Jackson, Owner, Fresh ‘N Fancy Goats Milk Soap and Lotion

Dr. Thomas Schaer, Owner, Meadowset Farm and Apiary

Colleen and Michael Histon, Owners, Shepherds Manor Creamery

8:45 p.m. – Questions, Evaluations and Adjourn

Please RSVP to Susan Garey by January 9th truehart@udel.edu or (302)730-4000 if you plan on attending so we can make the necessary arrangements for food and materials.

Planting a New Pasture of Hayfield? Part 6: Managing Pasture and Hay Fields for Long-term Health

Part 6: How Do I Manage My Stand So It Stays Healthy and Productive?

In Part IV, I discussed the advantages of planting into moist soil during the ideal planting window for the selected forage species. I then discussed the planting options such as conventional seedbed preparation and no-till seeding. Along with these options, I discussed the need for calibration of the planter or drill to ensure the use of the proper number of pure live seed (PLS) per acre. Let us assume that the new planting has emerged from the soil so it is time to think about how to properly manage the new seeding to ensure a successful establishment and long-term productivity.

Usually even before the seed germinates, grazers want to know when they can return animal to the pasture to graze it. Hay producers have an easier time deciding when to begin using a new field especially for fall planted fields since cool-season grasses will signal their successful establishment by flowering in late spring or early summer the year following seeding.

For new pastures, the key to long-term health of the pasture is to wait about 12 to 18 months before grazing a new field. This means that the new pasture will need to be hayed at least once and possibly several times in the year following fall seeding. From a practical viewpoint, few grazers will wait 12+ months since it means not grazing the field until the second spring following fall seeding. At a minimum, a new fall-seeded pasture should be hayed in late spring or early summer the year following seeding and then allowed to regrow to a height of 8 to 12 inches before grazing is begun. It is possible to plant in the fall and begin grazing first thing the following spring but you will be sacrificing stand health and longevity with this practice.

Nutrient management plans call for a new soil test once every three years but a yearly sample will help the grazer manage the pasture better. This is very important if nitrogen (N) fertilizer inputs are used to stimulate the productivity of a pasture. Even without N fertilizer applications, the natural deposition of urine and feces in a pasture creates small areas where the process of nitrification produces acidity that can significantly lower soil pH in the small area. Higher stocking rates and intensive pasture rotations will result in more uniform spreading of the urine and feces (especially for ruminant animals); and therefore, a greater proportion of the pasture will be impacted by lower pH (more acid soil conditions). Since it can take a year for lime to move an inch down through the soil, yearly soil testing will allow the grazer to begin neutralizing soil acidity as it is produced by the soil N-cycle.

Another aspect of soil fertility to consider is the use of fall applied N to improve the rooting of pasture plants as well as help stimulate growth the following spring for early grazing. Although the practice has long been used in the turfgrass industry, those of us in forage management are just realizing the potential benefits to pastures of fall N applications. Small amounts of fall N (about 30 lbs N/acre) should be applied in mid-October and mid-November since at these times topgrowth has ceased but the deep soil layers are still relatively warm. The N stimulates further root growth creating pasture plants with deeper and larger root systems as they enter the winter period. Some of the N is stored in the plant and available to stimulate topgrowth the following spring as the hours of daylight increase and air temperatures warm. This type of fertilization makes for a stronger plant going into the summer months (greater rooting depth and therefore greater available soil water to draw on) and can improve the competitiveness of the pasture grasses against weeds.

Probably the number one key to maintaining the health and competitiveness of a pasture is to use rotational grazing where plants are allowed to fully recover from the prior grazing period (grow to a height of 8 to 12 inches or more) and the grazing interval is kept short enough that the same plants are not grazed over and over again during a rotation cycle. Generally, this means rotating livestock out of a paddock or grazing cell within three days of moving the animals into the paddock. This time can be stretched to as much as a week but the more rapidly the animals are moved among paddocks in the rotational grazing scheme the healthier the pasture. Another aspect to using rotational grazing is to not put animals on pasture when soil conditions are too wet when the presence of animals can lead to compaction issues. Not grazing when plants are under drought stress is also a key consideration. Use the extra forage produced during the spring and fall to make hay that can support animals on a heavy use pad during periods of wet weather, drought, or other conditions leading to poor pasture growth.

Another method used to maintain healthy and vigorous pastures is to periodically overseed pastures in the fall with grasses and/or legumes. Some producers do this every year while others do it every couple of years. In most cases, the new seedlings must compete against the established plants in the pasture so that there is often limited ‘take’ from the germinating seed. However in the weaker areas of the pasture stand, there will be more light, water, nutrients, and space for the seedlings so establishment will be better in these areas. The weak areas would be where weeds could become established but by overseeding the pastures weed encroachment is limited or prevented.

The species to use for overseeding should be those species that can grow rapidly especially in the cool conditions of late summer and early fall. This would include such species as the ryegrasses, festulolium, ladino white clover, and red clover. Although just broadcasting the seed over the surface and then using a chain harrow or other implement to slightly cover the seed has been used, the best seeding method is to use a no-till drill and drill the seed into the soil. Seeding rates typically used are about one-quarter that of a normal new pasture seeding rate since most of the seed will be planted where established plant competition will not allow the new seedlings to establish successfully.

Finally, the producer can manage the balance of legumes and grasses in the pasture by his/her fertilization practices. Potassium and phosphorus applications along with 1 to 2 lbs of boron per acre per year and maintaining a near neutral soil pH (6.5-7.0) will encourage legume growth. If the percentage of legume is too high and the risk of bloat is too great, N application to encourage grass growth can be used to lower the percentage of legume in a pasture. Grasses with their fibrous root system are much more competitive for applied N than are the tap-rooted legumes. The available N will stimulate the grass and help it shade the legumes as well as change the proportion of legume to grass biomass.

This article was submitted by Dr. Richard Taylor, Extension Agronomist, University of Delaware.  Dr. Taylor can be reached at rtaylor@udel.edu

Is It Time to Plant a New Pasture or Hay Field? Part 5: Planting the Crop

Part 5:  When Do I Plant and How Much Seed Do I Use?

In the earlier posts in this series, I discussed some of the decisions and planning that need to be taken ahead of planting hay and pasture fields.  For this article, we have entered the ideal planting time for forage grasses and legumes.  However although we are in the ideal window for planting, there will be areas that have received enough rainfall to recharge the topsoil with moisture as well as areas that have not received enough rainfall for a successful seeding.  For those areas that remain dry until mid- to late-October, the best decision is likely to postpone planting until next year.

Some species have specific requirements that limit how late in the fall you can plant.  For example, reed canarygrass requires at least six weeks between planting and the average date of the first frost; otherwise, the crop could be winterkilled or severely weakened over the winter leaving the crop unable to compete with the usual spring flush of weeds.  Other species, such as Kentucky bluegrass, just take a very long time (21 to 28 days) to germinate and should not be planted late in the fall.  Before deciding to plant a species or mixture, be sure to study the species in question to avoid missing the ideal planting window.

In areas that have received enough rainfall to replace soil moisture reserves, planting can begin.  Early planting can lead to well established forage seedlings that are able to survive winter temperature extremes and get off to an early vigorous start next spring.  Early planted stands are better at competing against weeds next spring and often produce higher yields as well.  Work by Dr. Marvin Hall at the Pennsylvania State University showed significant yield decreases for all forage species tested as the date of fall planting was delayed with higher losses occurring the further north the site was located.

If planting into a prepared or tilled seedbed, be sure that all weeds have been killed during soil preparation and that a good smooth (clod-free), firm (your shoe should not sink deeper than the sole level) seedbed is prepared for planting.  Seed is then broadcast on the seedbed and firmed or pressed into the soil with any number of devices.  Seed of small seeded forages should not be buried more than 1/8 to ¼ inch deep.  Covering the seed is ideal since seed in contact with moist soil readily absorbs water but is not quickly dried again by the heat from the sun.  Seed can also be planted using a Brillion seeder followed by a cultipacker or roller or seed can be placed in the soil using a drill with packing wheels that firm soil over the seed.

Since drills (no-till and conventional drills) place the seed in rows from 4 to 8 inches apart, depending on the drill, I generally recommend that you drill at half the recommended seeding rate and run the drill twice over the field at about a 45 degree angle.  This will help new seedlings to cover the soil surface more quickly and reduce the chances for weed seed to germinate and compete with the new forage crop.

Another method of seeding is to use a no-till drill following an herbicide burn-down program.  This is especially useful when perennial weeds with underground rhizome systems are present.  Examples of these weeds are hemp dogbane, Canada thistle, and horsenettle.  Often several herbicide applications will be needed to get these weeds under control so plan a weed control program well ahead of seeding.  One of the best times to apply a translocated herbicide is in fall when weeds are sending carbohydrates (sugars) down to underground storage organs (rhizomes).  If a systemic herbicide that can move inside the plant is used, it will be taken with the sugars down to the rhizomes and help kill the meristem buds that are next year’s growing sites for the weed.  Read the herbicide label for the exact interval between treatment and seeding.  Generally for Roundup® or glyphosate you should wait several weeks after herbicide application before planting.  Since the herbicides used for control of these perennial broadleaf weeds will kill legumes that often are included as a component of pasture mixtures, it is best to work on controlling these weeds a year or two before spending the money to establish a new seeding or to renovate an existing stand.

In all cases I’ve talked about, be certain to calibrate your seeding equipment and make sure the drills and other equipment are clean and functional before entering the field.  These days forage seed is quite expensive so make the most of the money you spend by accurately calibrating your equipment.  This involves the following procedure:  weigh out some seed to add to the planting equipment, determine the width of area covered with seed by the equipment (in feet), run it for a certain number of feet (the length—say 50 or 100 feet); multiplying the two numbers together to get the number of square feet covered by the seed; divide that number by 43,560 (number of square feet in one acre); and finally weigh the amount of seed remaining in the equipment.  Subtract the final weight from initial weight and divide that number by the number of acres you covered (usually this will be a number such as 0.15 or even 0.015 or other very small number).  If your seed weights were in pounds of seed then the number you calculate at the end will be in pounds per acre or if you had access to an egg scale or something that measures in grams then divide the number of grams of seed used by 454 (grams per pound) to obtain pounds of seed and then divide that number by the number of acres planted in the calibration test.  If all else fails, email me or give me a call and I’ll help you do the calculations.

In summary, I’ll list some of the key points to keep in mind.

  • Make adjustments to soil fertility well in advance of seeding or renovating.
  • Have all perennial weeds under control before establishing a new seeding or conducting a major renovation in a field.
  • Monitor soil moisture levels to be sure an adequate reserve of soil water is available to establish the crop.
  • Understand the requirements for the forage specie or species chosen especially as it relates to fall planting date.
  • Start with a weed-free seedbed whether for conventional tillage or no-till.
  • Unless the site is known to be very low in available soil nitrogen (N), allow the new seedlings to develop 2 to 3 leaves before applying N in the fall.
  • Don’t delay planting; try to hit the optimum planting window.
  • Ideally, cover the seed with just a little soil but at the very least press the seed into the soil to ensure good soil to seed contact.
  • Most seeding rates really refer to the numbers of pure live seed (viable potential seedlings) that should be planted per acre so do the proper calculations to plant the correct amount especially when using coated seed.
  • If using preinoculated, lime-coated legume seed as a component of the pasture/hay mix, you should check to be certain the seed has been stored away from heat and high humidity and is not more than a year old, otherwise fresh legume inoculant should be applied to the seed just prior to planting.
  • Many small seeded species now come with a range of coatings (lime, moisture control compounds, etc.) that can halve the weight of pure live seed in the container so you should be sure to account for this when calculating the correct seeding rate.

In the last installment of this series, I’ll discuss how to manage new pasture and hay fields for long-term healthy stands.

This article was submitted by Dr. Richard Taylor, Extension Agronomist, University of Delaware.  Dr. Taylor can be reached at rtaylor@udel.edu

Is It Time to Think about Renovating or Planting a New Pasture or Hay Field? Part 4: Planting Method

Part 4: How Should I Plant My Hay Field or Pasture?

What’s the best means of seeding fields, no-till or conventional tillage (a prepared, weed-free, firm seedbed)? As with any choice, there are advantages and disadvantages to each method. Both seeding methods allow for weed control activities before seeding but no-till is limited only to herbicide applications. Whenever deciding on an herbicide to use, read the label carefully to be sure there are no rotation restrictions of what can be seeded following the herbicide application or how many days or months must separate the application and seeding activities. Also use the label to determine if a single application will be all that is needed or whether you will need follow-up applications and if you will at what stage of growth must the new seedlings reach before the next application is applied. This latter concern is especially important for perennial and hard to kill weeds such as hemp dogbane, Canada thistle, horsenettle, and others.

No-till drills must be calibrated properly to deliver the correct amount of seed per acre as well as be set to place the seed at the correct seeding depth with adequate soil to seed contact for fast germination and emergence. Never assume that the last person to use the drill set it up properly for your seeding. When you spend a hundred or more dollars per acre just for seed, you need to be sure the seed is being planted as best as possible to ensure a successful establishment. No-till drills also place the seed in rows usually from 7 to 10 inches apart so it often is useful to cover the seeded area in two directions making a cross hatch pattern over the field to help the plants fill in the space quicker. Brillion seeders that broadcast seed over a prepared seedbed and then press the seed into the soil have the advantage of achieving canopy closure much sooner than no-till seeding.

Canopy closure is when the new plants get large enough that they are able to shade the underlying soil and therefore reduce the ability of weeds from germinating and establishing in the field. Fields seeded with no-till drills can be many years (if ever) filling in so that a full canopy exists during normal grazing activity. This is one disadvantage to the no-till drill although it is offset by the soil conservation advantage of no-till when a field has enough slope to allow significant water erosion or enough exposure to allow wind erosion problems if the weather turns dry again.

Which method is best? Since each has both advantages and disadvantages, it will depend on your situation. No-till helps conserve the soil in situations where soil can be loss; it reduces moisture loss since the soil is not disturbed; it doesn’t encourage new weed growth since buried weed seeds are brought to the surface; it does not introduce oxygen into the soil causing the soil organic matter to be reduced via oxidation; and when done correctly it ensures rapid germination and emergence since seeds are placed in the soil and soil is firmed around the seeds. From the negative side, no-till does not allow nutrients and lime to be worked into the soil profile; no-till does not help break up compaction issues from previous grazing or haying equipment use; and no-till seeding is often in rows that can be seen for years in some cases.

Conventional tillage does allow nutrients and lime to be incorporated in the soil; it allows tillage during the summer to help with weed control issues; it allows for the summer establishment of annual smother crops for weed control and to introduce organic matter into the soil; it allows you to rip fields to help alleviate compaction issues; and it allows seed to be broadcast to ensure rapid canopy closure. Some of the disadvantages include the loss of soil moisture during the tillage operation as well as the loss of soil organic matter during tillage. The above lists of advantages and disadvantages are not meant to be exhaustive but to point to some of the important factors you should consider when deciding on seeding method.

This article was submitted by Dr. Richard Taylor, Extension Agronomist, University of Delaware.  Dr. Taylor can be reached at rtaylor@udel.edu