Baled Corn Stalks Offer Another Feed Option

As winter approaches, some producers are questioning if their hay inventories will last until spring. Cornstalks can extend hay inventories, but their use comes with some important considerations.

“Residual corn left in the field is not going to be captured in the bales, which lowers the feeding value compared to grazing the field,” notes Jeff Lehmkuhler, University of Kentucky extension beef specialist.

The best forage quality from the corn crop residues is in the leaves and husks, he says. The cobs and stalks are lower in digestibility with protein concentration ranging from only 3 to 6 percent, which is too low to meet the needs of cattle. The highest quality forage portions of corn crop residues are the leaves and husks.

Lehmkuhler explains that energy levels in cornstalk bales vary depending on the stalk to leaf ratio within the bale. Typical ranges are from 48 to 58 percent. Additionally, the high moisture levels of the stalks make baling and storing corn residue more difficult.

Feeding cornstalk bales can result in high levels of waste, according to Lehmkuhler. Cattle will pick through a bale, eating the leaves and husks while leaving behind the stalks. For this reason, the best way to utilize corn crop residues for feed is having the bales processed or by flail chopping the residue in the field to improve drying. Processed bales can be fed in a total mixed ration or along a feedbunk.

The extension specialist recommends feeding baled corn residues to dry, mid-gestation cows, remembering to supplement nutrients to meet diet requirements. Cattle fed cornstalks should be in good body condition and not be experiencing any environmental stresses, such as cold and mud. Environmental stresses on cattle will require additional supplementation.

Lehmkuhler offers an example diet for a mid-gestation cow of 15 pounds of cornstalks, 1.5 gallons of condensed distillers solubles (distillers syrup), and 2 pounds of soybean hulls plus minerals to meet requirements.

“Significant energy and protein supplementation are needed for lactating, fall-calving cows,” Lehmkuhler notes. “Producers should work with a nutritionist to ensure nutrient needs are being met.”

Lehmkuhler recommends hay for lactating cows, but he notes that cornstalks may be worked into the diet to stretch hay supplies with proper supplementation.

To extend hay inventories, feeding cornstalk bales is a reasonable option. Remember to work with a nutritionist to meet all nutritional requirements and supplement as needed. Lehmkuhler advises to not overpay for cornstalks since supplements, along with additional feed costs, will often be needed.


We’ve Got a (bale) Weight Problem

As the growing season comes to an end, the hay buying and selling season begins.

It’s still amazing how many round bales get sold on a per bale/roll basis rather than by weight. It’s a practice that almost always ends up with someone getting the short end of the stick.

I recall a Wisconsin project from a few years ago that involved a couple of extension agents going farm to farm weighing large round bales with portable pad scales. Prior to obtaining the actual bale weights, the agents and the bale owner estimated the average bale weight of the three bales that were weighed at each farm.

Overall, both the agents and farmers missed the actual average bale weight by 100 pounds, sometimes being over and other times being under the actual weight. The extension agents noted that there was not only large farm-to-farm variability but also extreme differences within bales of the same size located on the different farms.

In my own extension agent days, I used to help coordinate a quality-tested hay auction once per month. I would summarize the auction results and then post them on the internet.

Some sellers preferred to sell their hay by the bale instead of by the ton. This always meant that I’d have to estimate bale weight and convert to a price per ton because that is how the results were reported.

Initially, I dreaded doing this because I didn’t always trust the accuracy of my own guess, so I would always ask a few farmers what they thought. As you might expect, there were often wide ranges among those people who I would ask, leaving me to guess which estimate was the closest. Sellers would sometimes tell me that most people underestimate bale weight, and that’s why they like to sell by the bale if they can.

Multiple factors at play

There are a number of factors that can influence bale weight. They include:

• Bale size/shape

• Bale density

• Bale moisture

• Time of sale

• Forage species (grass or legume)

• Forage maturity (percent leaves and stems)

• Model and age of the baler

It’s fairly intuitive that size of the bale will impact bale weight, but what may be overlooked is the degree of change that occurs when a bale is only 1 foot wider or 1 foot more in diameter. The latter accounts for the largest change.

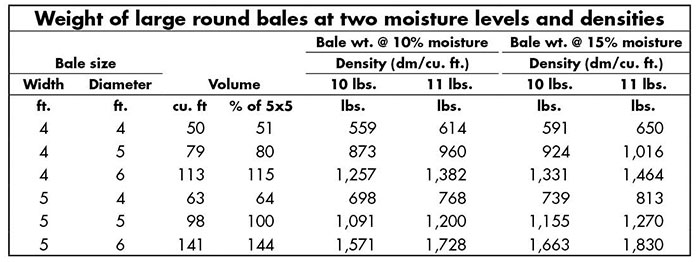
A bale that is 4 feet wide by 5 feet in diameter (4×5) has 80 percent of the volume of a 5×5 bale (see table). However, a 5×4 bale has only 64 percent of the volume of a 5×5 bale. Those percentages also translate to differences in weight if all other factors are equal.

Bale density also plays a rather large role in final bale weight. It often ranges from 9 to 12 pounds per cubic foot. In a 5×5 bale, the difference between 10 and 11 pounds of dry matter per square foot amounts to over 100 pounds per bale at both the 10 and 15 percent moisture levels. Missing the weight of a bale by 10 percent amounts to some pretty significant dollars when multiple tons are being purchased.

Forage moisture also plays a role in bale weight but to a lesser degree than bale density, unless bales are extremely dry or wet. Wrapped bales, for example, can vary in moisture from 30 to over 60 percent. When purchasing baleage, it is always recommended to either weigh the bales or have a rock-solid moisture test.

Time of purchase impacts bale weight in two ways. First, if you’re purchasing bales out of field, they are likely going to be at a higher moisture level and weight than they will be after being cured in storage. There is also a natural tendency for dry matter loss during storage that the buyer will incur if bales are purchased immediately after baling. As has been well documented by research, storage losses can range from below 5 percent to over 50 percent, depending on storage method.

Forage species also affects bale weight. Grass bales generally will weigh less than legume-based bales of similar size. This is because legumes such as alfalfa will make a denser bale than a grass species. In the previously mentioned Wisconsin study, the average weight of a 4×5 legume bale was 986 pounds. This compared to 846 pounds for grass bales of the same size.

Plant maturity is another factor that impacts bale density and ultimately bale weight. Leaves generally pack better than stems, so as plants mature and develop a higher percentage of stems to leaves, bales generally become less dense and weigh less.

Finally, there are many models of balers of differing ages. This variation, coupled with operator experience, lends further variability into the bale density and weight discussion. Newer machines are able to make a much denser bale than most older ones.

Given the number of variables that determine the actual bale weight, buying and selling large round bales based on a weight guess is likely going to result in a transaction that is either above or below market value. This can be extremely expensive for the buyer or seller, especially when a large number of tons are purchased over a period of time.

Weighing round bales might not be as convenient as not weighing them, but there are very few situations where a bale weight isn’t attainable. Take the time to weigh bales (all or a few) whenever a transaction is made.

Some Thoughts on Halloween Hay

Many regions have now or will soon reach the point when significant alfalfa regrowth won’t occur if the crop is cut one more time. Research has historically shown that cutting when the chances for regrowth are low is safer from a winter injury or kill standpoint than cutting earlier in the fall when regrowth is still possible.

There are three primary reasons why farmers decide to cut alfalfa late in the fall. They are:

1. Don’t want to leave money on the table.

In the case where favorable weather has contributed to significant fall growth, it’s hard to leave an apparent high-yielding, high-quality crop out in the field. However, the reality is that late fall-cut alfalfa is rarely high yielding.

Yes, the crop can sometimes be tall, but the stems are usually small and there are fewer of them. What looks like a high-yield crop usually shrinks to nearly nothing when put into a swath or windrow. This makes for expensive forage when harvest costs are considered.

On the flip side, late fall-cut forage is almost always excellent quality. With the extended cool temperatures, there is low fiber deposition and plant digestibility stays high.

2. It will smother out if not cut.

There’s been a long-held concern by some that fall alfalfa growth will smother and kill a stand over winter. This simply does not happen with a legume such as alfalfa. Rather, leaves freeze and eventually drop off the plant. Stems, for the most part, stand erect. The old, fall aftermath growth may impact forage quality in the next year’s first cutting, but if harvested early enough the reduction in quality is minimal.

3. There’s a need for feed.

Following a year of severe winterkill or drought, sometimes alfalfa is cut in late fall simply to meet a need for additional feed. This may apply to many in 2019.

Is there risk?

Though the risk to cut alfalfa in the late fall has proven to be less than when regrowth potential is high, the practice is not without some downside. Already mentioned is the fact that yields are typically low; they will be even lower if the cutting height is raised as is often recommended for a late-fall cut.

Also consider that fields cut in the late fall generally break dormancy later during the following spring and have a lower first-cut yield compared to not being fall cut. The gain in fall yield is about equal to the loss in spring yield. This is not to say that the fields are winter injured but rather less vigorous come spring.

Leaving the fall aftermath growth over winter is beneficial to not just catching and holding snow cover, but it also has the effect of moderating soil temperature fluctuations during winter and early spring. It is extreme soil temperature fluctuations that may cause alfalfa to break dormancy too early or cause plant heaving.

Finally, consider the condition of the alfalfa stand before taking a late-fall cut. If it’s already been stressed by intensive cutting, pest issues, or low soil fertility, stress from an additional cutting will likely accelerate stand decline.

All factors considered, the need for feed prior to the next year’s harvest may be the only good reason to cut alfalfa in late fall.

Silage Season Safety – Processing & Packing

When you’re processing and putting up silage in any type of structure, it’s a complicated job, and potentially dangerous.

Silo Gas

  • Let’s talk silo gas for a minute – also known as nitrogen dioxide.  It’s a normal part of the silage making process.  We start to see this gas a few hours to a day or so after a silo is filled – And then it’s produced for about 2-2.5 weeks
    Silo gas is created in ANY type of silage storage
    system, but is a particular problem in tower silos.

    depending on conditions – Silo gas is produced
    in ALL kinds of silos – tower silos, bunkers, piles, bags – the biggest issue however, is when it’s a confined space.  This could be in a tower silo, an adjoining room, the chute or in the space between silo bags.

  • In the air, nitrogen dioxide has a faint yellowish color though in low light conditions, you probably won’t see it…It smells a bit like bleach.  It is very irritating — even a few breaths can cause serious health problems.
  • Avoid silo gas, especially during that initial three-week post-harvest window. Treat a tower silo and areas surrounding stored silage as a confined space.  Ventilate thoroughly – generally with the blower.  Get more information – entering any confined space incorrectly has deadly consequences.

Bunker Silo Rollovers & Other Issues

  • There are special hazards with packing a bunker silo.  Some great detailed information can be found in this piece from Penn State on horizontal silo safety.
  • Tractor rollovers occur every season while people are packing bunkers and piles – It’s critical that you select the right tractor – it MUST have a ROPS (rollover protective structure) and a seatbelt.
  • A wide front-end is also an absolute must. Front-wheel and front wheel-assist tractors provide extra traction and stability for packing. Duals usually increase stability as well as appropriately-placed weights.
  • Backing a tractor up ANY slope is preferred – you achieve better stability AND CONTROL.
  • On a slope – as you fill a bunker, make sure your packed, wedge-shaped surfaces are not too steep – We generally talk about a safe slope being 3 to 1 or something even less steep. On a pile or bunker that’s 20 feet high, you need a wedged surface do drive up that’s at least 60 feet long in the horizontal direction.  Anything less, and you run a great chance of rolling a tractor.
  • There are many other precautions to take with your employees and family members who are working at this time…Like these:
    • Only experienced people should be permitted to operate equipment.
    • Require all equipment operators to remain in their vehicles to avoid being run over.
    • Keep visitors and children out of ANY farm work zone.  A packing operation seems cool and fun to watch – but operators have a lot to pay attention to, and the chaos associated with visitors and bystanders can be very distracting.
    • Have workers wear brightly colored safety vests or t-shirts to increase visibility.

This post was originally developed to support a series of silage harvest-related podcasts posted by colleague Liz Binversie of Brown County, UW-Extension.  This one is written to connect to the podcast covering processing and packing

Silage Harvest Starts with Planning

August is the time to start planning and making arrangements for silage harvest. It’s also a good time to bring the team together and make a checklist of what needs to be done to ensure nothing gets missed, said Rory Lewandowski, Extension Educator at The Ohio State University.

Starter checklist:

  • Speak to harvesting team or custom harvester
  • Check the chopper to ensure it’s in excellent working condition
  • Line up equipment, including hauling trucks or wagons and packing tractors
  • Make sure there are enough properly trained people on-hand to use equipment
  • Have pile covering materials ready for use

Monitor Moisture

“With corn silage harvest, you’ve got one shot to get it right and you’ll be using that silage for about a year, maybe longer,” he said. “It’s so important to get dry matter content right because if you don’t, you’re going to really struggle.”

Ideally, target 35% dry matter (DM) for all your silage, but the range is 32% to 38% DM. There are some issues if silage is harvested too wet or dry, but if you must err, Lewandowski recommends harvesting wetter rather than running too dry.

“Typically, corn silage dries down about ½ percentage point of moisture each day. Last year, we ran into a warm streak and were at ¾ percentage point a day, so it went from ‘not quite ready’ to ‘should have harvested yesterday’ very quickly,” he said. “So, you’ve got to monitor daily.”

Length of Cut

Length of cut is critical to fiber digestibility. While fine, small pieces make for easy packing and exclusion of oxygen, they don’t make effective fibers in the ration or the rumen.

“If you’re not using a kernel processor, the theoretical length of cut should be set at ¼ inch to ½ inch,” he explained. “But if you are using a kernel processor, it helps to increase the availability of starch, so we cut a little bit longer at ¾ inch. Those who are shredding the whole plant length-wise can cut bigger pieces – up to 1 inch.”

Inoculants

There are two types of inoculants to consider:

  1. Lactic acid – if in past years you’ve struggled to get a good fermentation, use a lactic acid bacteria at the point of chopping. It helps produce more acetic acid and drops the pH.
  2. Lactobacillus buchneri – If you’ve had problems in the past with feed out and spoilage, then consider adding a L. buchneri inoculant. It helps to increase the stability of silage. It also boosts your acetic acid, which works on spoilage organisms to like yeast and mold, especially as you open the face up.

“There are a lot of good inoculants on the market. Do your research,” he advised. “Also, make sure you use enough and be cognizant that these are living organisms. Don’t use chlorinated water and watch the water temperature.”

Excluding Oxygen

“Oxygen and air are the enemy of silage,” he said. “Packing helps us to exclude it, but a lot of producers have a hard time measuring it. The goal is to have a density 42 to 45 pounds per ft3 of silage as its delivered to the bunker silo. On a DM basis, that’s a density of 14 to 16 pounds per ft3.”

To get there requires having enough weight to pack and packing in a timely manner. A few tips:

  • For every ton of silage, you need 800 pounds of weight for packing. If delivering silage at 50 tons per hour, multiply that times 800, and it tells you 40,000 pounds of packing or 20 tons of tractors (or packing equipment) are needed for packing
  • Never put down more than a 6-inch to 8-inch layer
  • Pack that well
  • Apply another 6-inch to 8-inch layer

The goal is to harvest quickly. Once you’re done, it’s critical to cover the silo as soon as possible to keep oxygen out and protect it from the elements.

“In recent years, research on a two-step covering product where they have the oxygen barrier sealing and a regular piece of plastic over the top has shown to help with fermenting high-quality silage,” Lewandowski said. “Research has shown that putting plastic on the inside wall of your bunker silo can help to increase the quality of that silage as well.”

Once covered, seal it either using bags with weights or cut tires that are touching one another. If you’re bagging silage, make sure it’s packed tightly but consider leaving the end open for a day to release some of the air and gas, then seal it up tight, he noted.

Safety Tips

  • Big equipment visibility is often very limited, so always keep children away from the area.
  • Plan a pre-harvest meeting with silage crew and farm employees, especially those not directly involved in the silage process to share what’s going to be happening to minimize their risk.
  • Don’t pack silage above walls.

Check Your Corn Chopper Now

Now is the time to do corn chopper maintenance, before the crush of harvest. ( Farm Journal, Inc. )

Now is the time to do corn chopper maintenance, giving you time to order new parts if needed.

“To ensure the entire chopper is in good condition, replace nicked knives and the shear bar if the edges are smooth,” Michelle Jones, with the University of Kentucky. “If the rollers are showing signs of wear, replace them.”

Rollers typically have a life span of about 60,000 tons of corn silage, she says. “Irregular wear of the roller teeth can prevent the narrowing of the roller gap, resulting in insufficient damage to the kernel which can lead to reduced starch digestibility for the cow.”

The ideal roller gap is 1 to 2 millimeters, and a quick way to check proper gapping is to use a dime. A dime is 1.2 mm thick. “Place the dime between the rollers and if excessive space is found, the tighten the roller gap,” she says.

Once in the field, you can check if processing is correct by scooping a sample of silage into a 32-ounce cup, explains Donna Amaral-Phillips, a dairy nutritionist with the University of Kentucky. Spread the sample on the ground and count the number of whole or half kernels. If you have less than two whole or half kernels per cup, processing is ideal. Two to four whole or half kernels per sample suggests processing is adequate, but more than 5 whole or half kernels means adjustments to the roller should be done.

To ensure the samples are representative, take sample from three different loads. At a bare minimum, take three samples at the end of each day.

“If the results of kernel processing are not monitored during harvest, starch digestibility may be reduced,” says Amaral-Phillips. “Once the silage is chopped and stored, fixing mistakes made during harvest is difficult.”

You can read more about chopper maintenance and adjustments here.

Prevent Pasture Damage During Wet Weather

It might seem odd to be thinking about preventing damage to pastures from  wet weather in mid- to late summer, but heavy, persistent rains across some portions of the country in July are posing potential problems.

In the worst case scenario, cattle can be moved to a sacrifice area and fed stored feeds until pasture soil returns to acceptable conditions, says David Hartman, a livestock Extension educator with Pennsylvania State University. “The area should eventually be repaired with tillage if necessary and then reseeded to either an annual or perennial mixture, depending on your goals,” he says.

The other key is to move cattle more frequently during wet weather. Some farmers prefer grouping cattle into a high stocking density area to contain damage to a small area. Others prefer to spread cattle out over a larger area. “Regardless of [your] management decision, moving cattle more frequently than usual helps to avoid or reduce the concentration of damage,” says Hartman.

He also urges farmers to maintain heavy sod conditions to withstand grazing pressure. Keeping stands thick might involve over-seeding, soil testing and maintaining adequate fertility and avoiding overgrazing, he says.

Using no-till seed establishment is generally recommended. “Cattle traffic during wet weather will be much less damaging on land that has been planted no-till versus with tillage,” Hartman says.

“Finally, good grazing management should always include leaving a considerable amount of residual forage when moving cattle to the next paddock,” he says. “Overgrazed pastures not only recover more slowly from grazing during droughty conditions, they also sustain more damage from grazing in wet conditions.”

It’s two, two, two feeds in one

By Mike Rankin

Our understanding of corn silage has come a long way in the past 20 years. That’s probably a good thing because it has emerged as a dominant feed source in most dairy and many feedlot beef rations. What is being achieved with corn silage these days is entirely different than what your grandfather was able to accomplish . . . or even comprehend.

To draw from the old Certs breath mint commercials, corn silage is two, two, two feeds in one. Some argue it’s a grain, others a forage. In fact, the grain and forage portion of corn silage are nearly equally distributed on a dry matter basis.

From a nutritional standpoint, we’re essentially interested in corn silage as a source of starch (energy) and fiber, along with their respective digestibilities. Agronomically, yield is always a consideration, especially if land base is a limiting factor.

When trying to maximize the utilization of one component, there is often, but not always, a trade-off with the other component. Of course, trade-offs in the forage and feed industries are nothing new.

It’s a war on kernels

“If you don’t break kernels, it’s very unlikely you will be able to utilize the starch,” Luiz Ferranetto, a dairy nutritionist with the University of Florida, recently said at the Four-State Dairy Nutrition and Management Conference in Dubuque, Iowa.

There was a day when the prevailing line of thinking was to simply crack the kernel during harvest and the cow would do the rest. Hopefully, nobody is still in that camp.

These days, the ability to make great corn silage has morphed into a war on corn kernels where “obliteration” is the battle cry. Of course, technological advancements in kernel processors have made that happen along with the ability to measure kernel processing scores (KPS).

It’s become really simple from a goal standpoint: If you don’t do a good job of kernel processing, starch (corn kernels) will merely take up space in the manure spreader.

Let’s conclude this brief starch discussion with one more rock-solid axiom of starch digestibility brought forth by Ferraretto: “As time of fermentation progresses, starch digestibility improves.” There is also about a 5 to 10 percentage unit gain in KPS.

Ferraretto noted that the current research suggests to not even feed corn silage until it has fermented 90 to 120 days in storage. He also mentioned that the development of new hybrids may shorten this recommendation in the future.

One final note on starch digestibility: Poor kernel processing at harvest cannot be compensated for by greater storage time. If it’s bad going in, it will be bad coming out. In other words, you have one shot to get it right.

Fiber manipulation

As with starch, research is also bringing to light new ways of improving fiber digestion in corn silage. Unlike conventional forage crops, corn for silage must be harvested based on whole-plant moisture. Harvest timing is not really an option to change fiber digestibility.

There are, however, two primary methods to improve fiber digestibility. One is hybrid selection with the most obvious (and maybe only) example being the selection of brown midrib (BMR) hybrids, which have significantly higher fiber digestibility than conventional hybrids.

This is where we come to the trade-offs. Brown midrib hybrids will typically have lower dry matter yields than the top tier of conventional hybrids. Further, many BMR hybrids will be lower in starch content and digestibility than conventional hybrids. Newer BMRs with a floury endosperm have been developed to help overcome this issue.

Another method to impact fiber digestibility is manipulating cutting height; this is a practice that is receiving more research attention and use in the field. The concept is simple — leave more lignin in the field.

Ferraretto and his graduate students recently completed a meta-analysis of cutting height research studies and developed simulation equations to predict the impact of high-cut corn on silage yield and quality.

In one of these simulations that was compared to an actual field study with good agreement, cutting corn at 24 inches versus 6 inches improved neutral detergent fiber digestibility (NDFD) by 3 percentage units, lowered NDF by 4 percentage units, and raised starch by 4 percentage units. At the same time, yield was lowered by about 10 percent, the same as might be expected by planting a BMR hybrid.

Ferraretto noted that perhaps the combination of greater plant densities and cutting height might lead to improved quality without compromising yields. Stay tuned. More research is on the way.

We’ve come a long way in improving corn silage. The savvy corn silage producer has learned that the benefits of new hybrid and machine engineering technologies can only be realized if silage production and storage strategies are top notch. Only in such situations can the combined milk-producing ability of both starch and fiber be fully exploited.